Over the weekend, I met with a client to make a sentimental locket while her husband and son browsed the store. She sat down at my workbench and first showed me a small bundle of hair tied with a red thread, then a small collection of sea glass and tiny fossils she had found at the lake. We joked a bit about the Great Lakes and how much we love finding glass even though it’s actually old garbage. Then she laid out the third item she brought, a tissue with a spot of deep red on it. Matter-of-factly she said, “And this is blood.”
Read moreMy Holographic Studio
This spring, after more than five years living in my apartment, I decided that my studio needed a major overhaul to make it a more beautiful and comfortable space to work in. Here are all the changes I made! This post contains affiliate links.

My studio is a small space attached to the back bedroom of my apartment. Previously used as motorcycle storage, it has linoleum over cement floors, stained ceiling tiles, dark and oily hollow paneling on the east wall, and when I moved in it had many layers of sloppy multicolored paint and really rickety wood windows. A while ago my landlord replaced the windows but I still didn’t do anything with the space and it was used mostly for storage of so. much. stuff.
I hated it but never wanted to spend the time or money on a rental. Given the current housing crisis it really sunk in that I’ll be here awhile and may as well finally get comfy! So after five years, I gave this room a coat of fresh white paint, a set of lockers, hung my framed artwork, added brand new window treatments, a bar to hang macrame plant hangers, and covered up this godawful paneling with the cheapest and easiest fix I could… an iridescent photo backdrop meant for bachelorette parties etc.
Here is what it looked like before. Just a LOT of stuff everywhere and sooooo much on the walls.

South side

North side

Northeast corner

East side
I took all of my stuff out (except the workbench, which I can’t move more than a few feet) and did a bit of KonMari organizing to shed the things that I really didn’t need to carry forward with me. Here is what it looks like now! It’s hard to take photos of such a small space so please excuse any warping — I promise I don’t live in an actual funhouse.
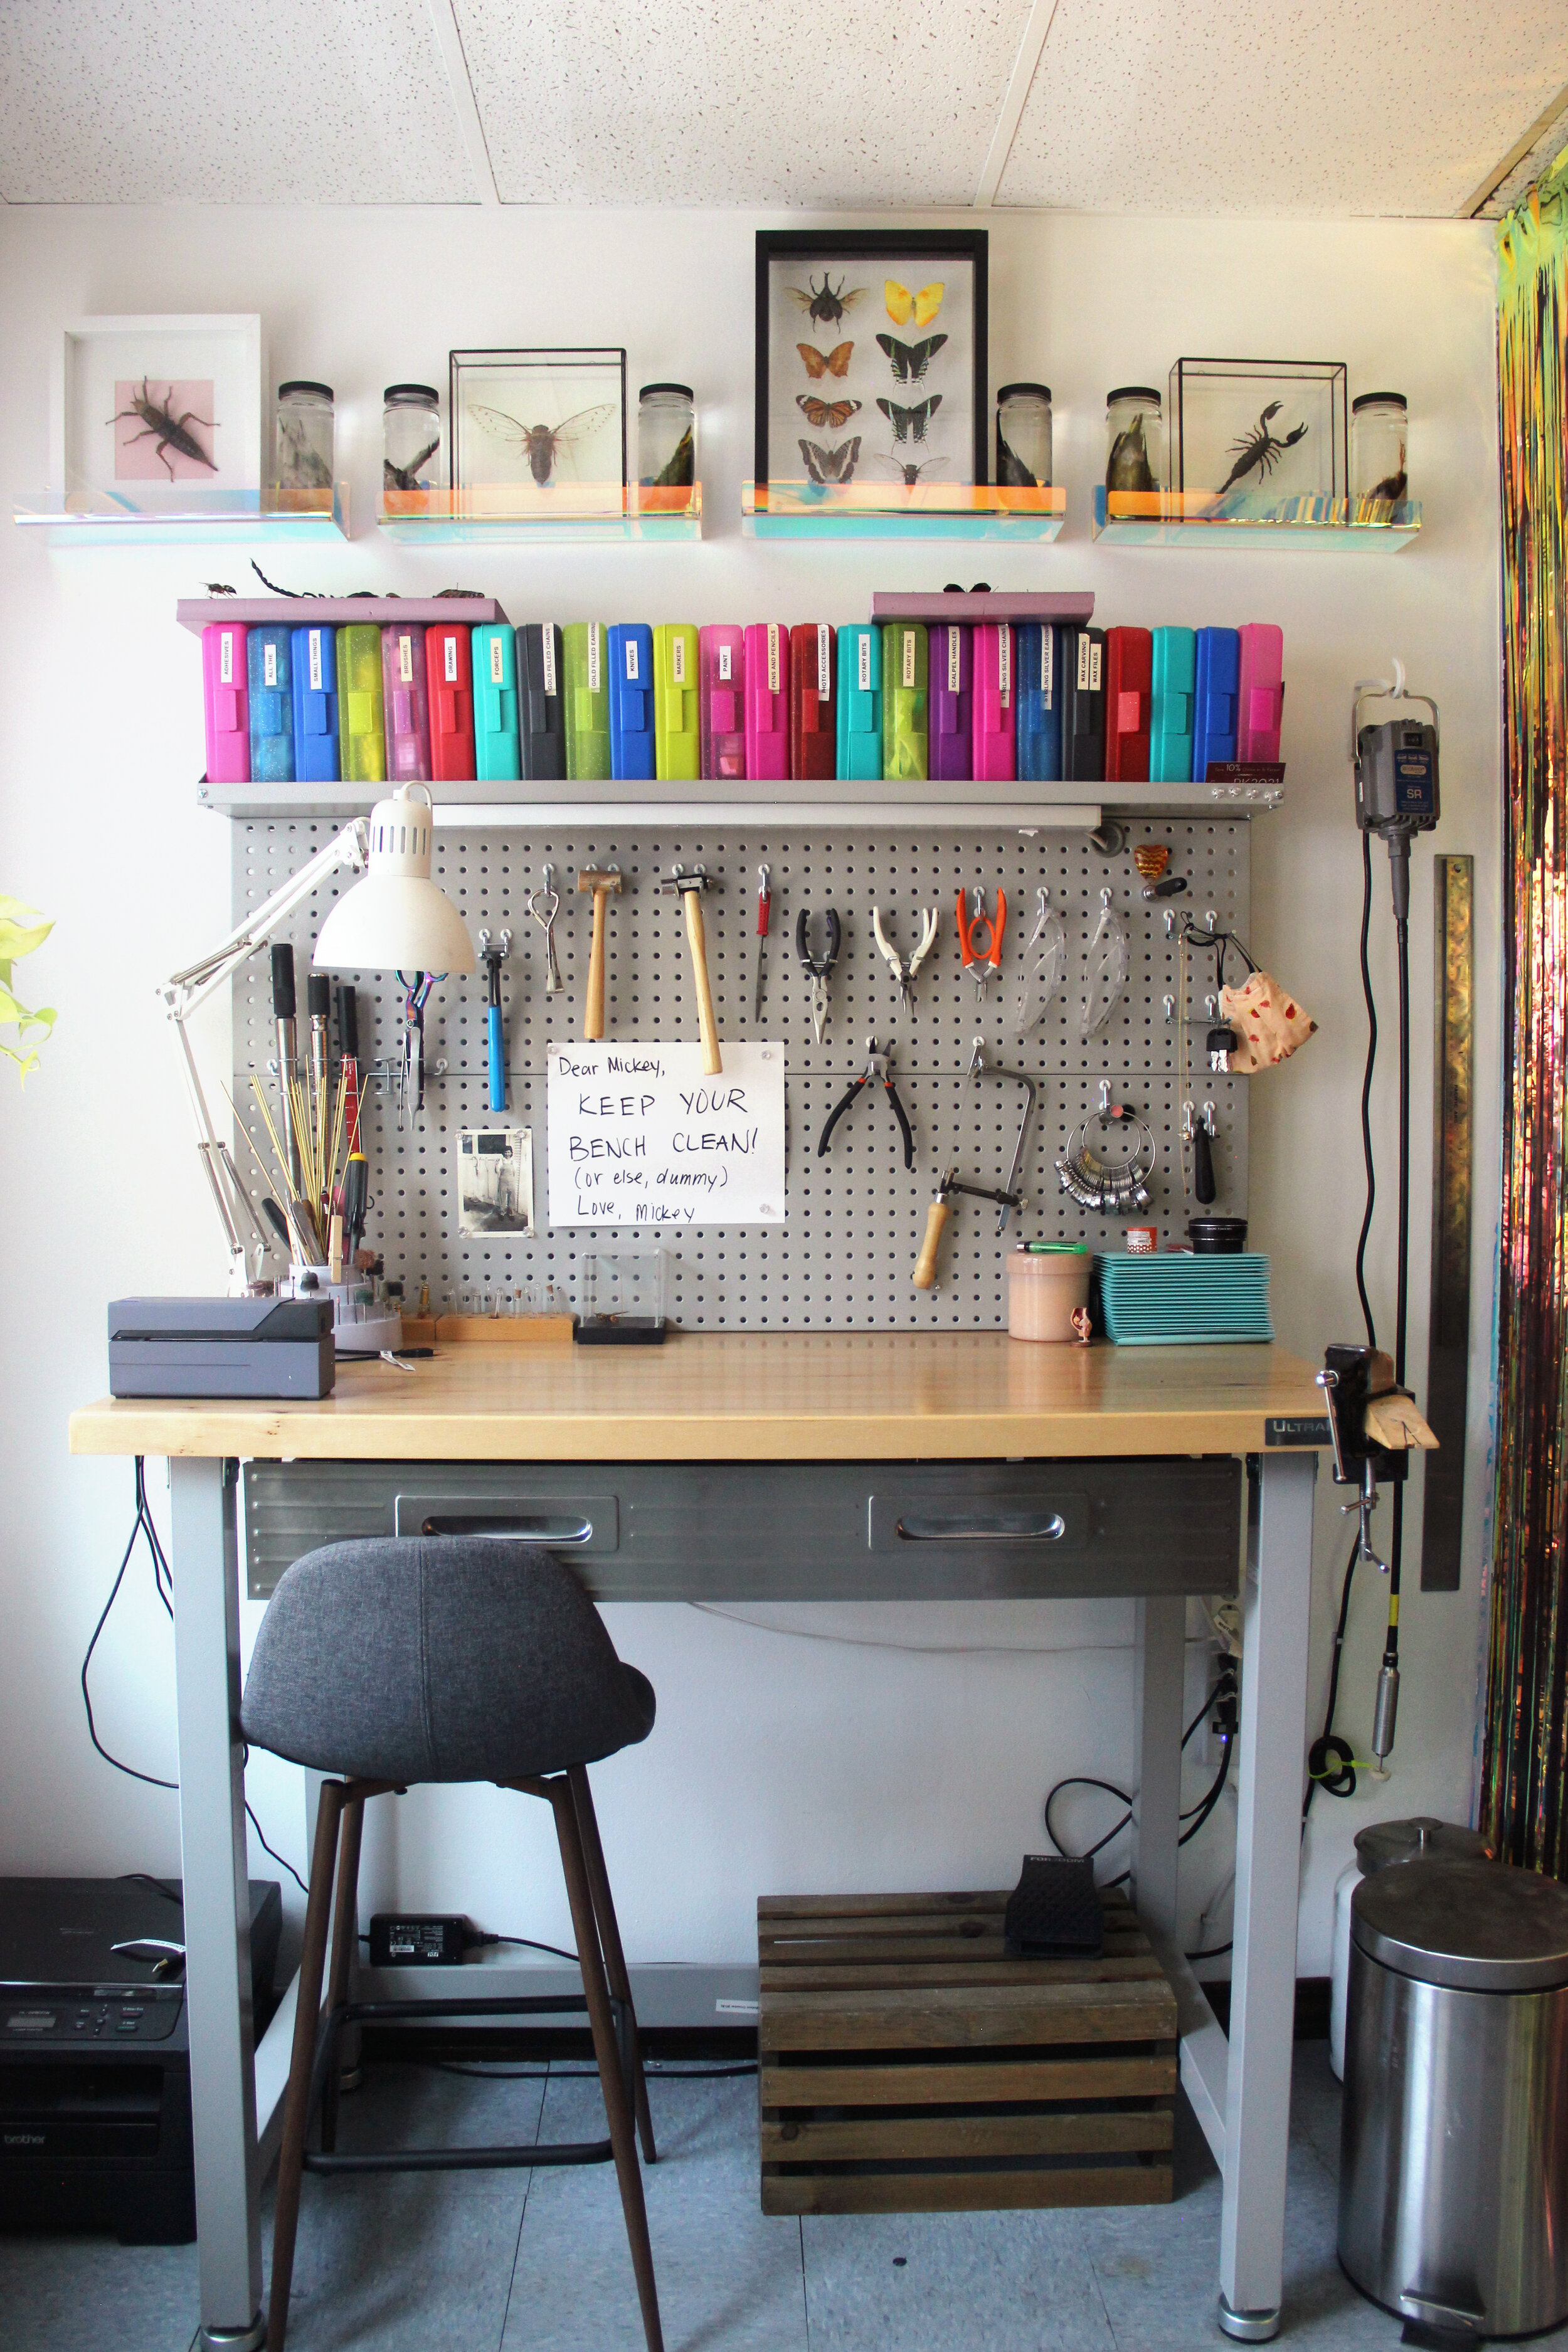
North side. Yes, the sign does actually help remind me to stay organized!

South side

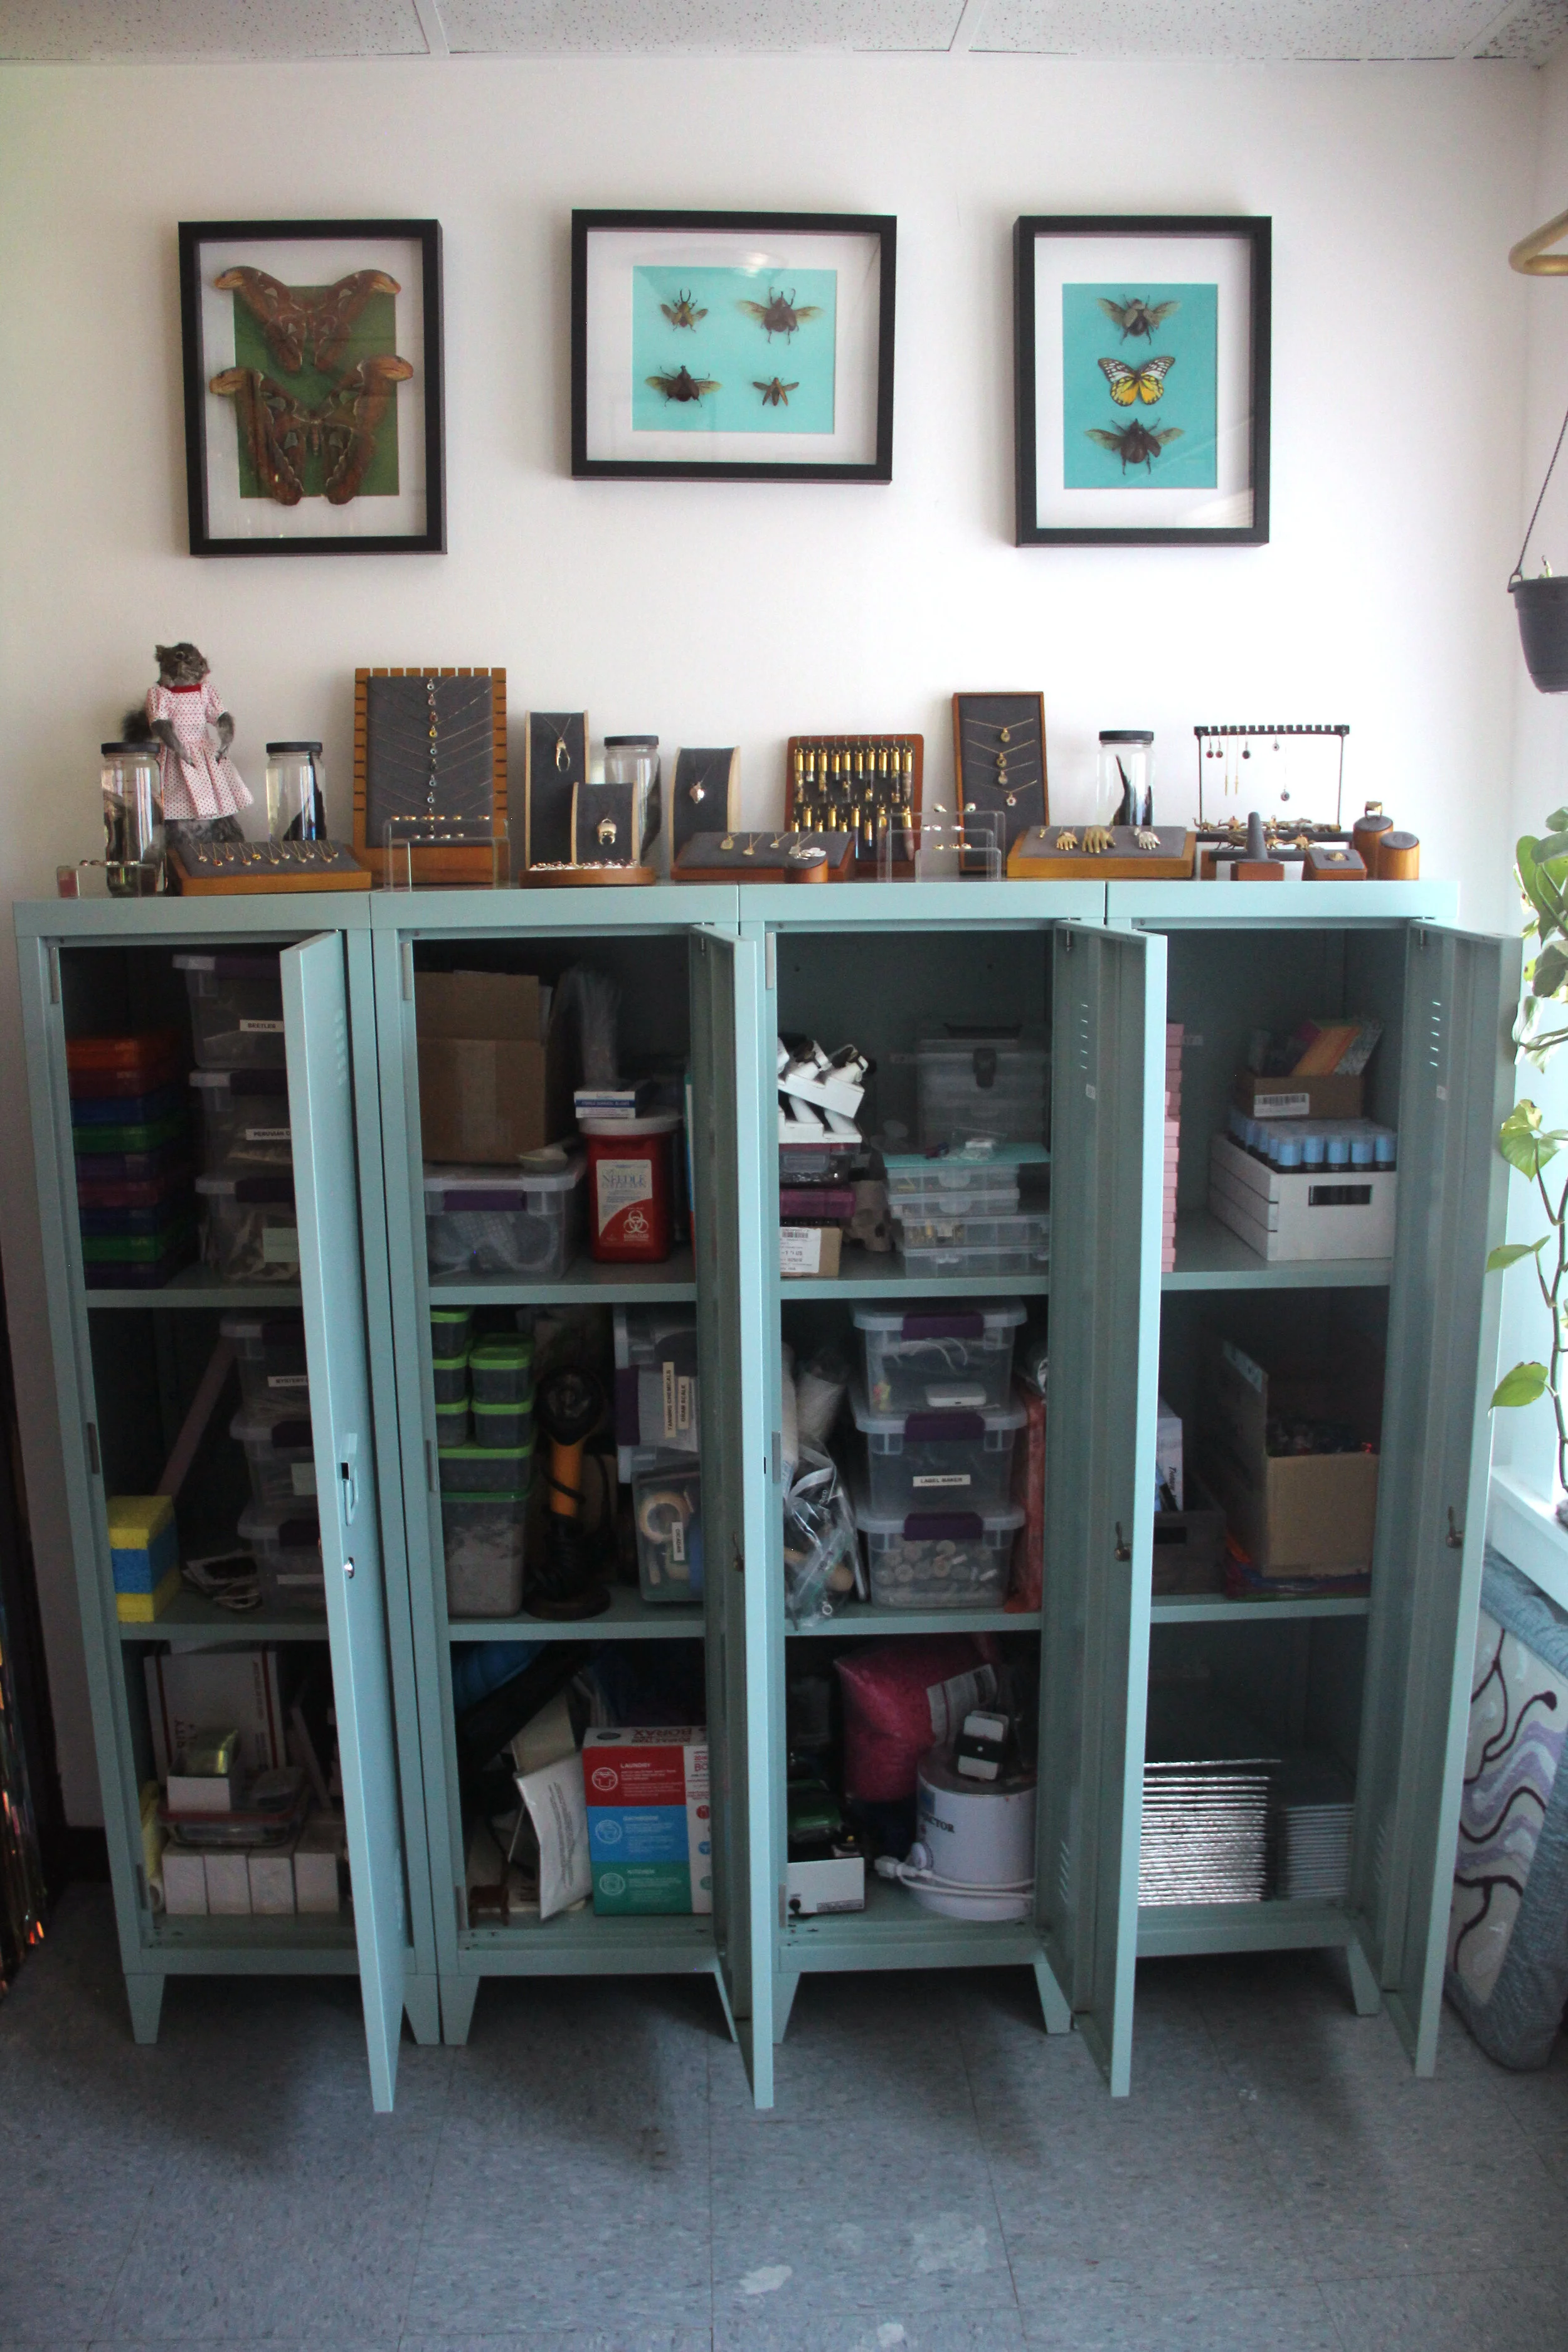
Northeast corner

Southeast corner

I love these lockers but wanted to add a self-closing element, so I bought a 12-pack of bar magnets. I use 3 per locker at the top, middle, and bottom.
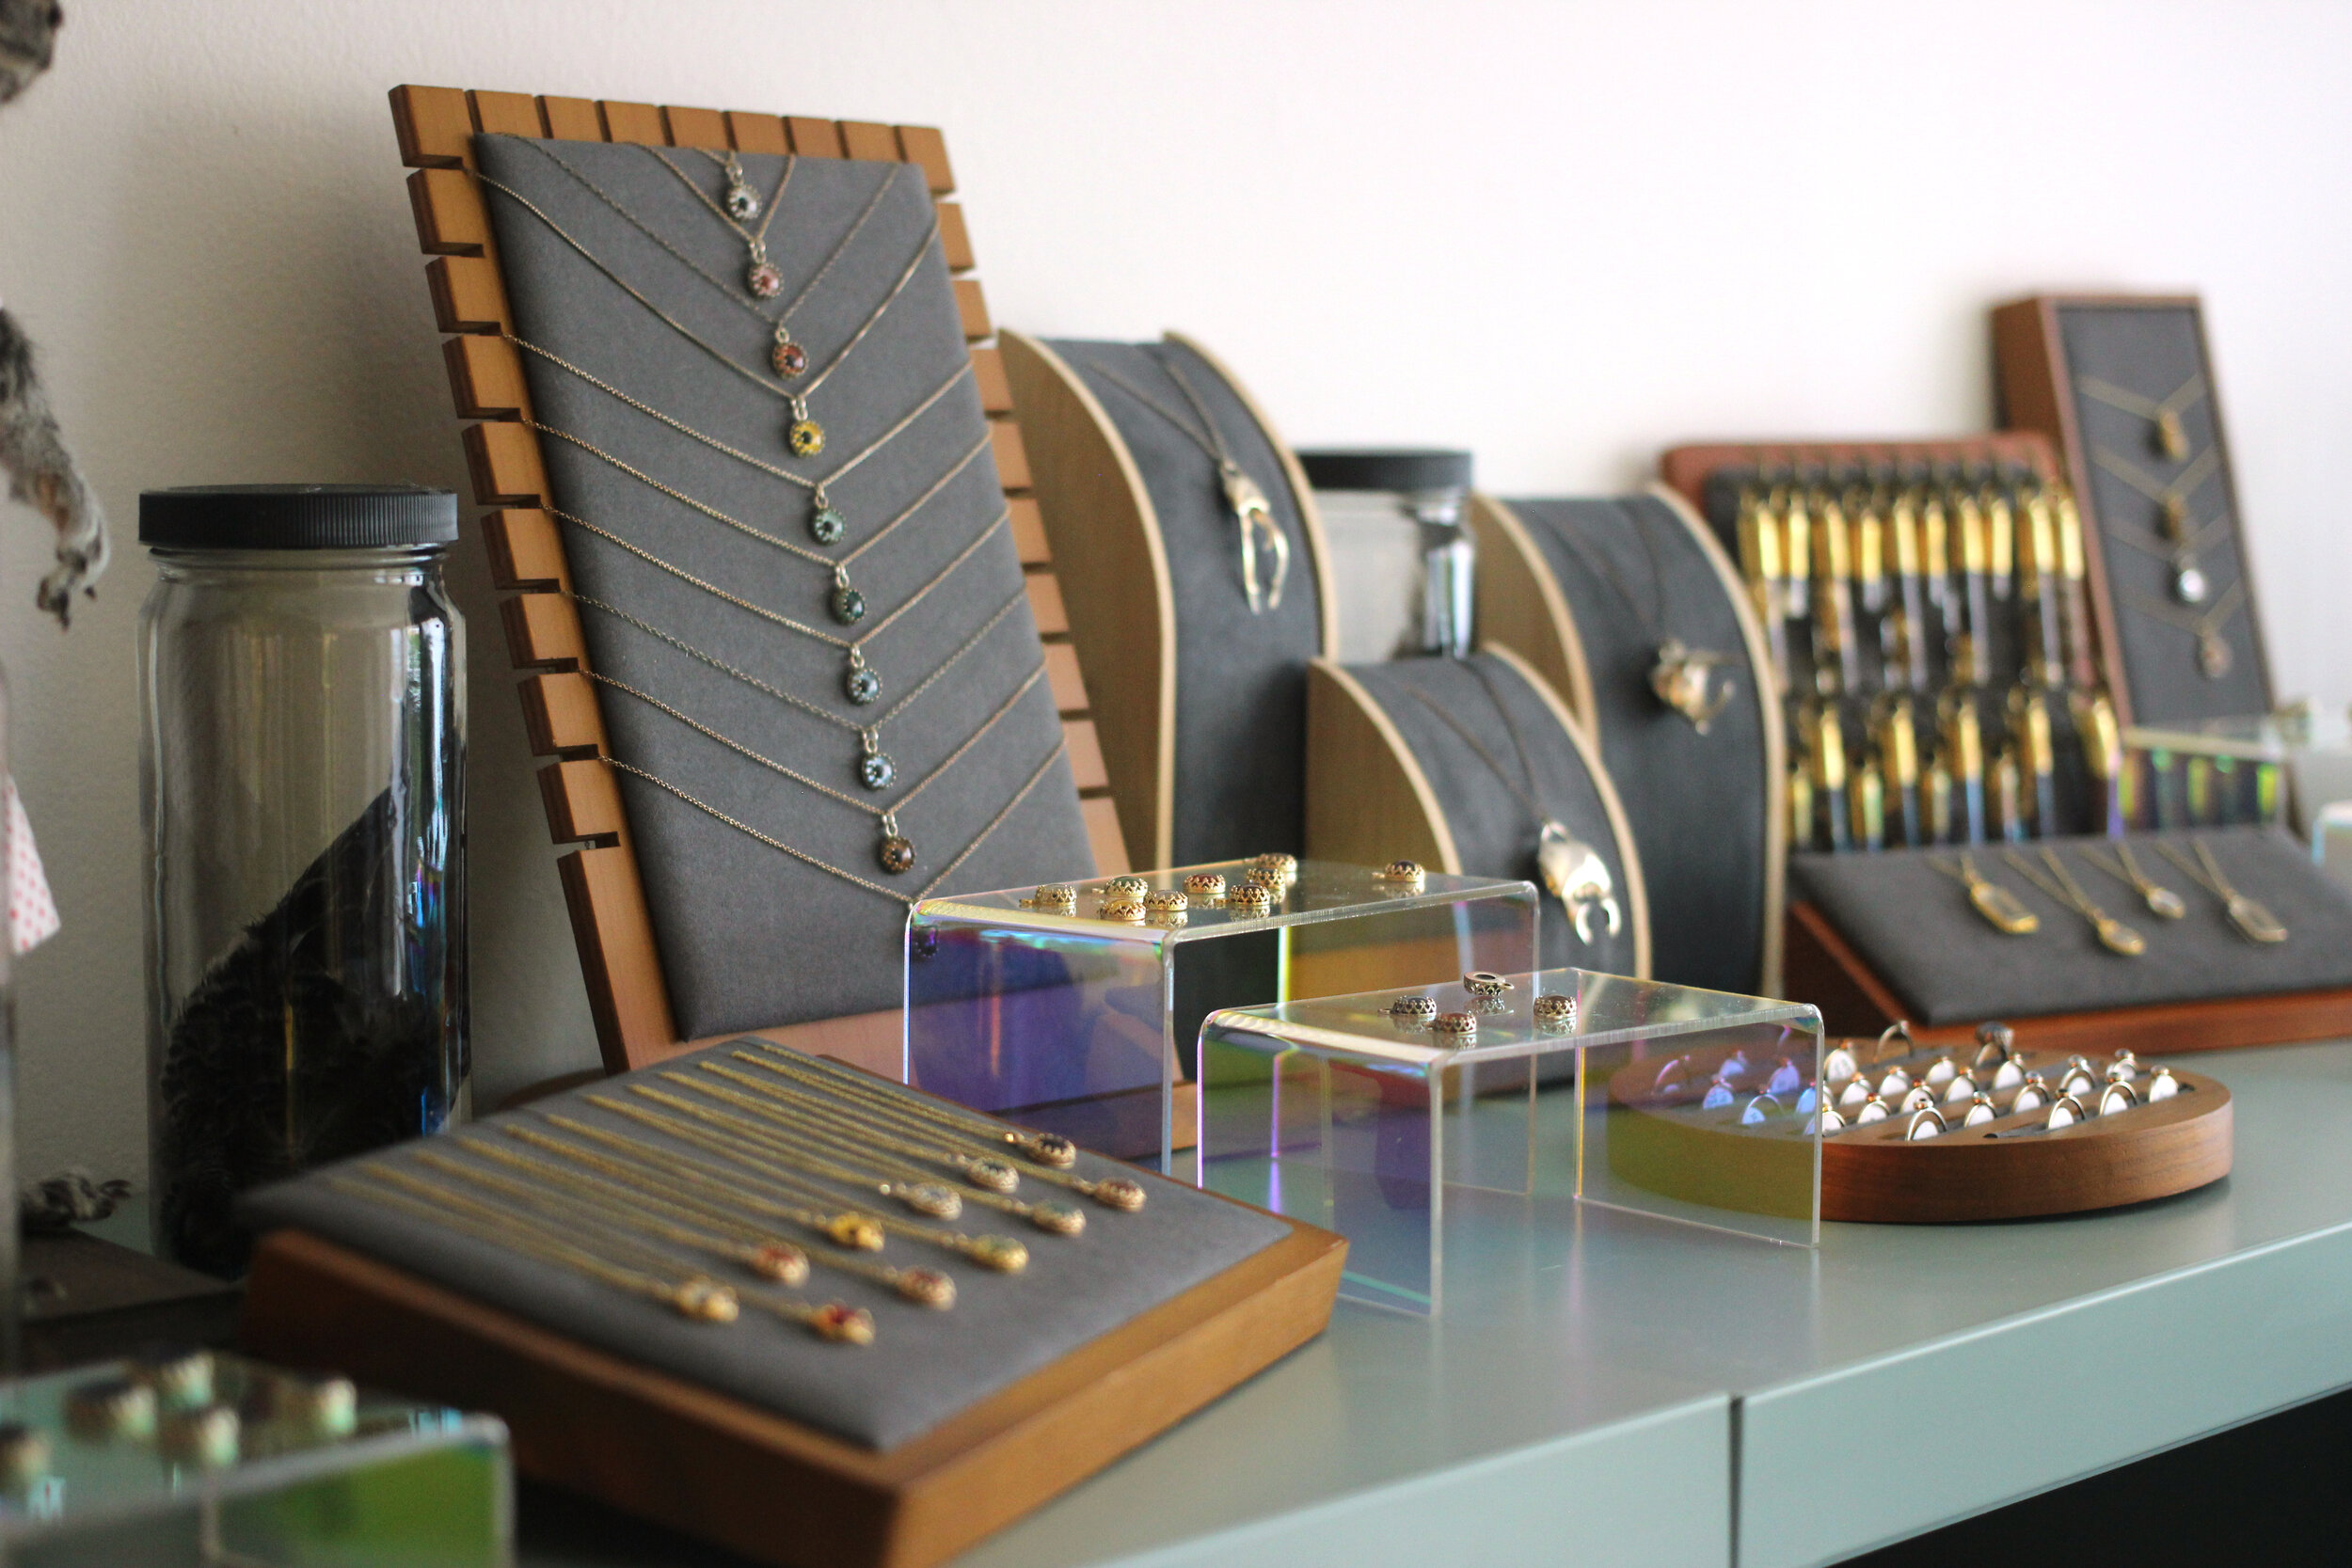
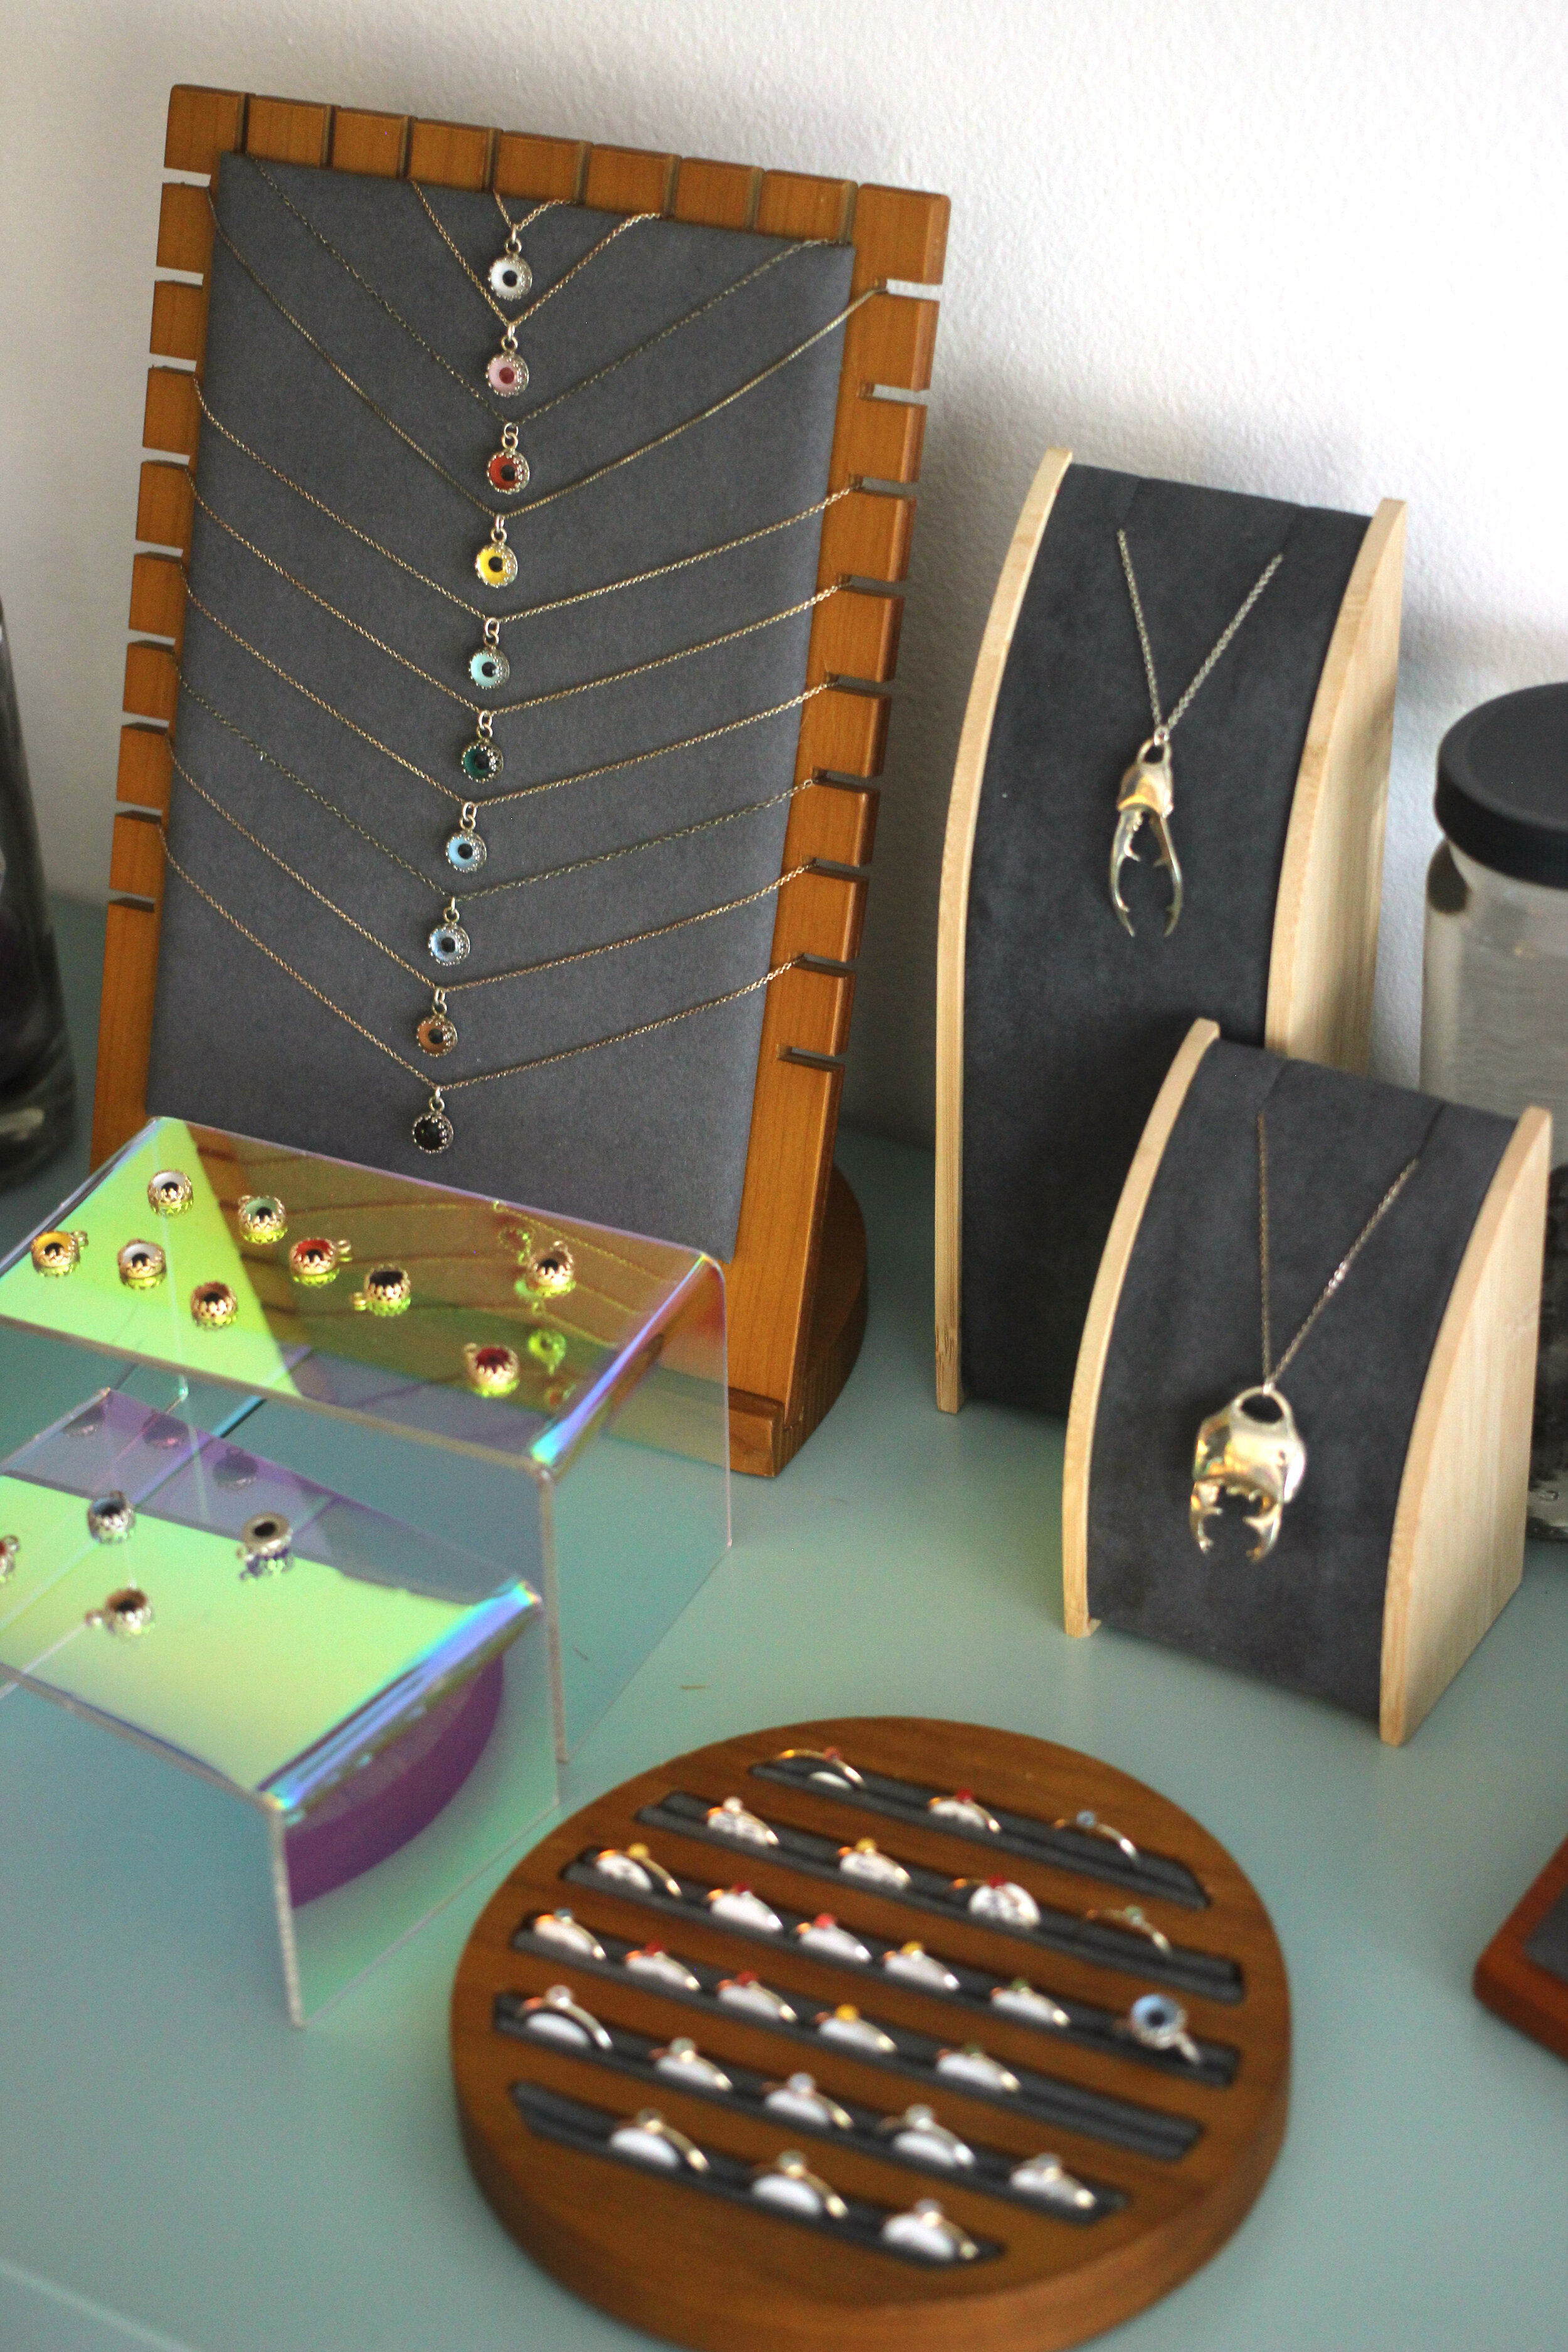
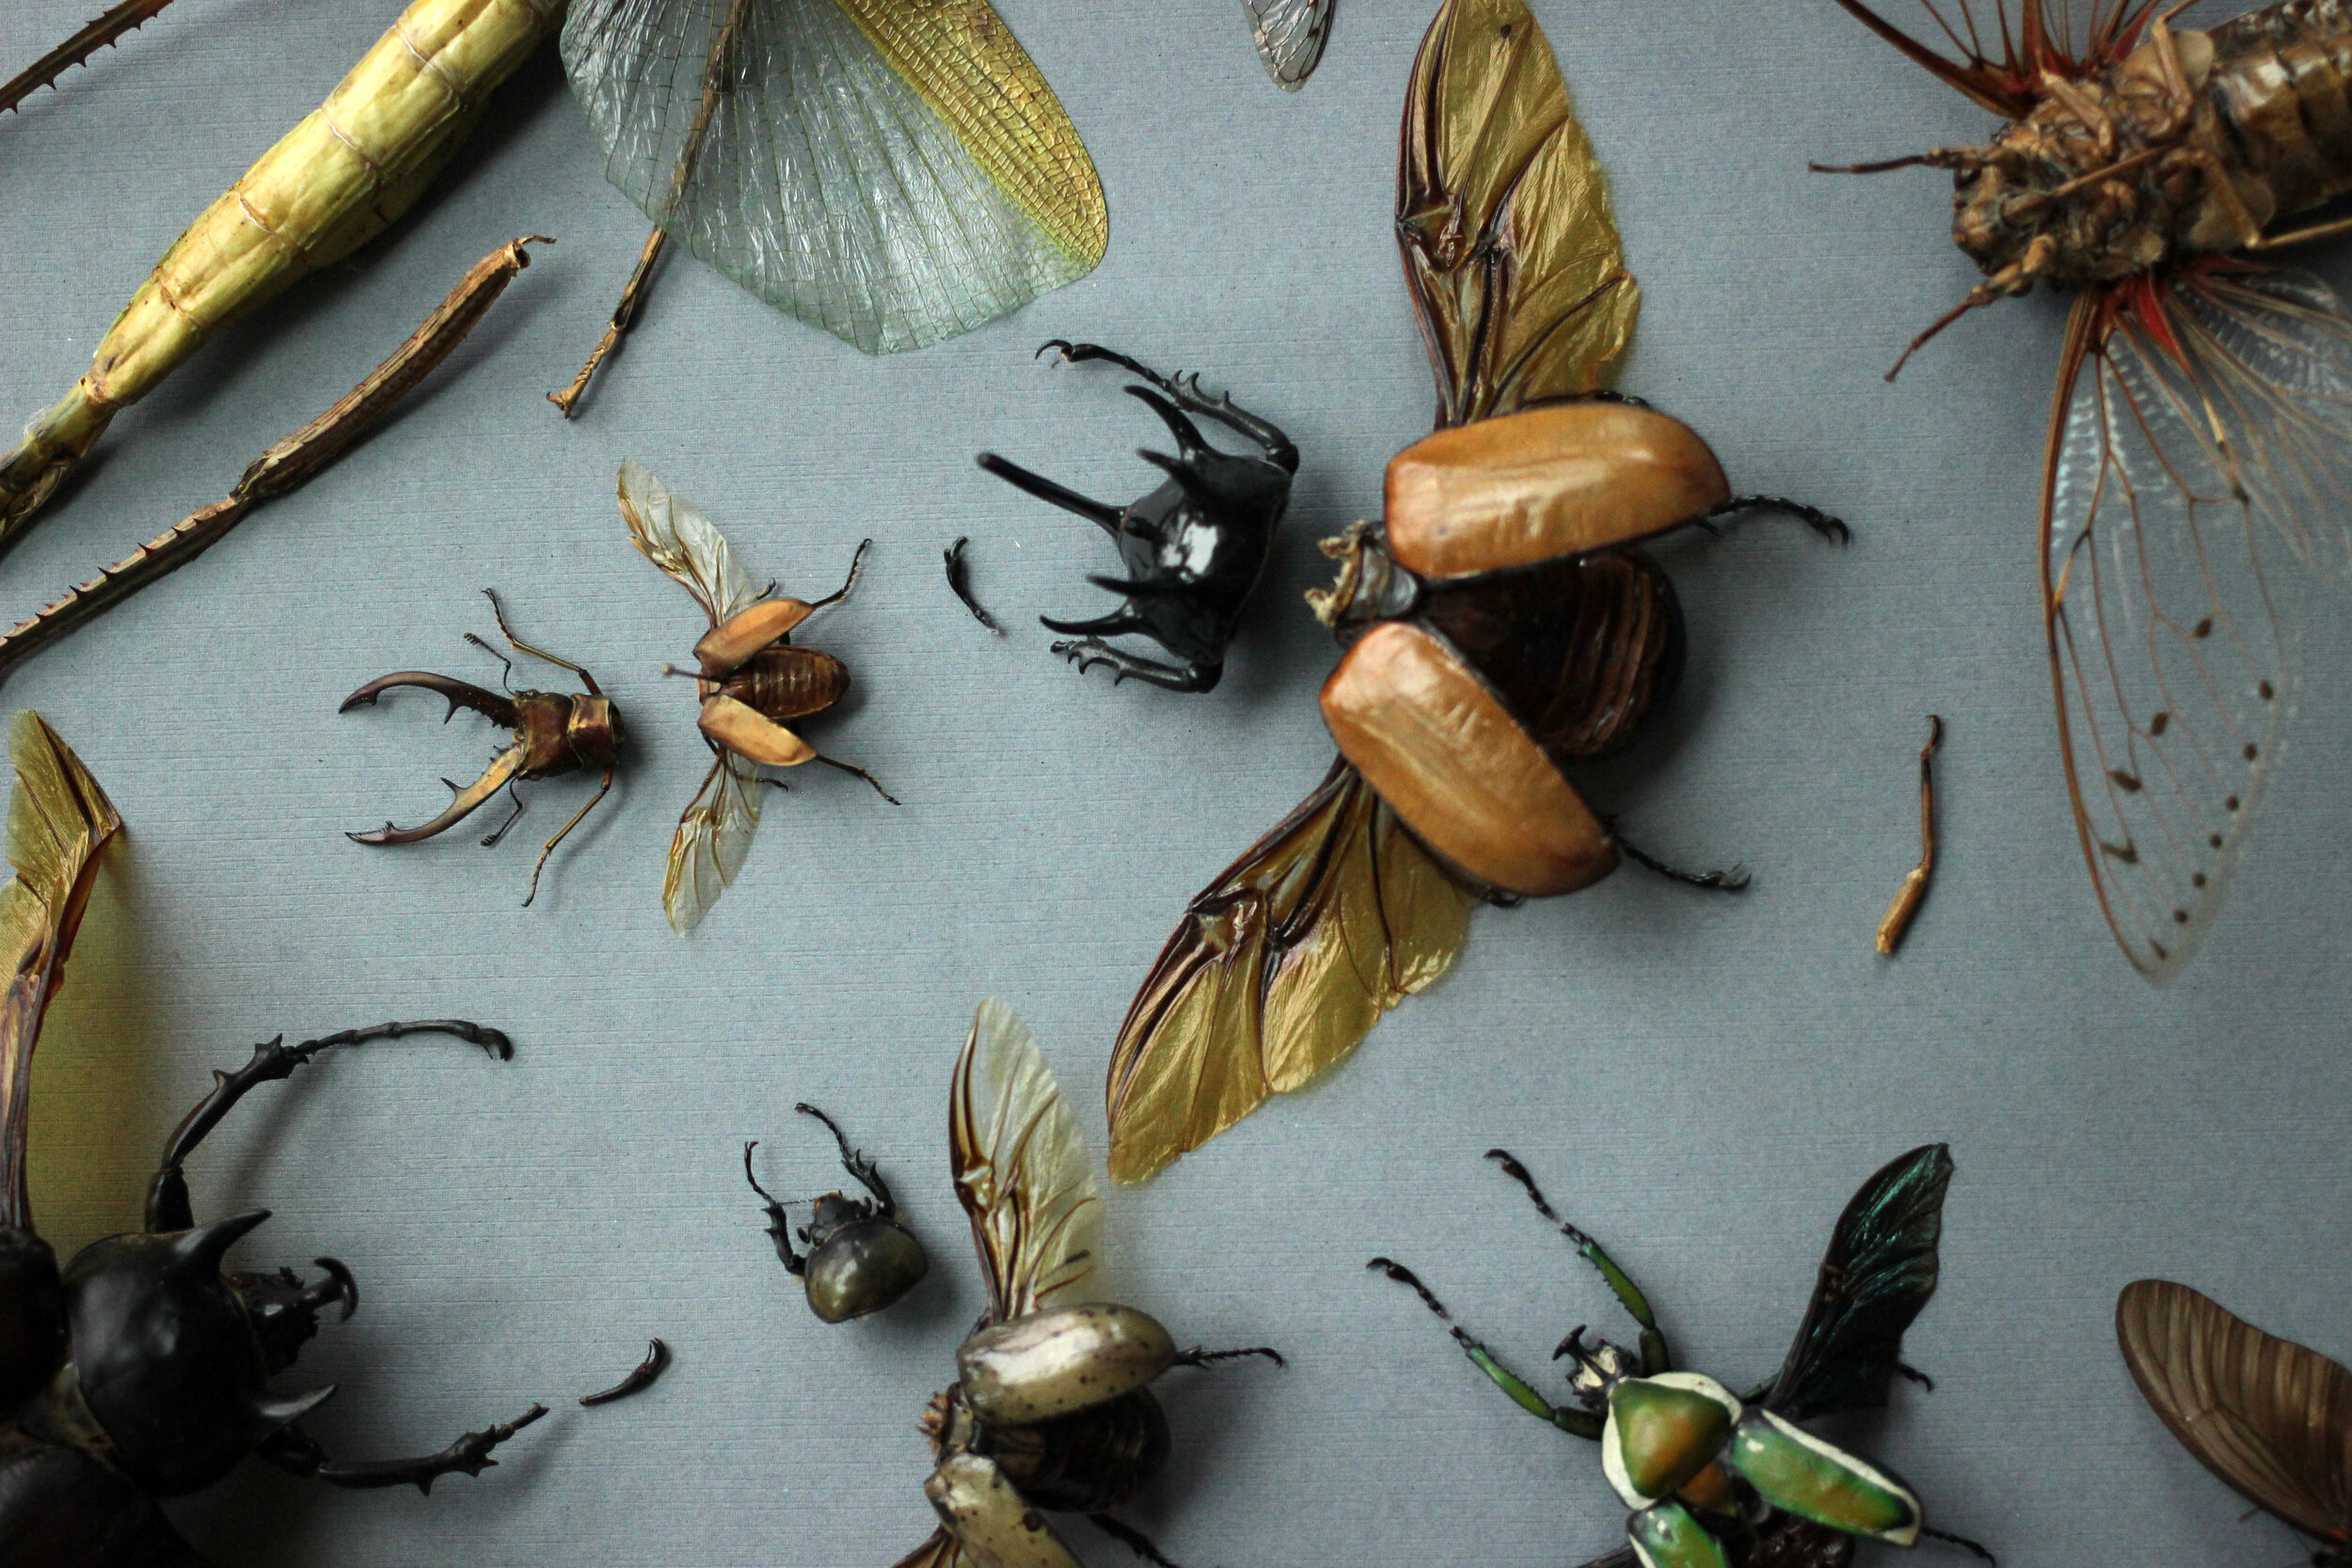
I love having all of my jewelry and specimens out and on display! Customers can make an appointment to shop in person and customize anything their way.
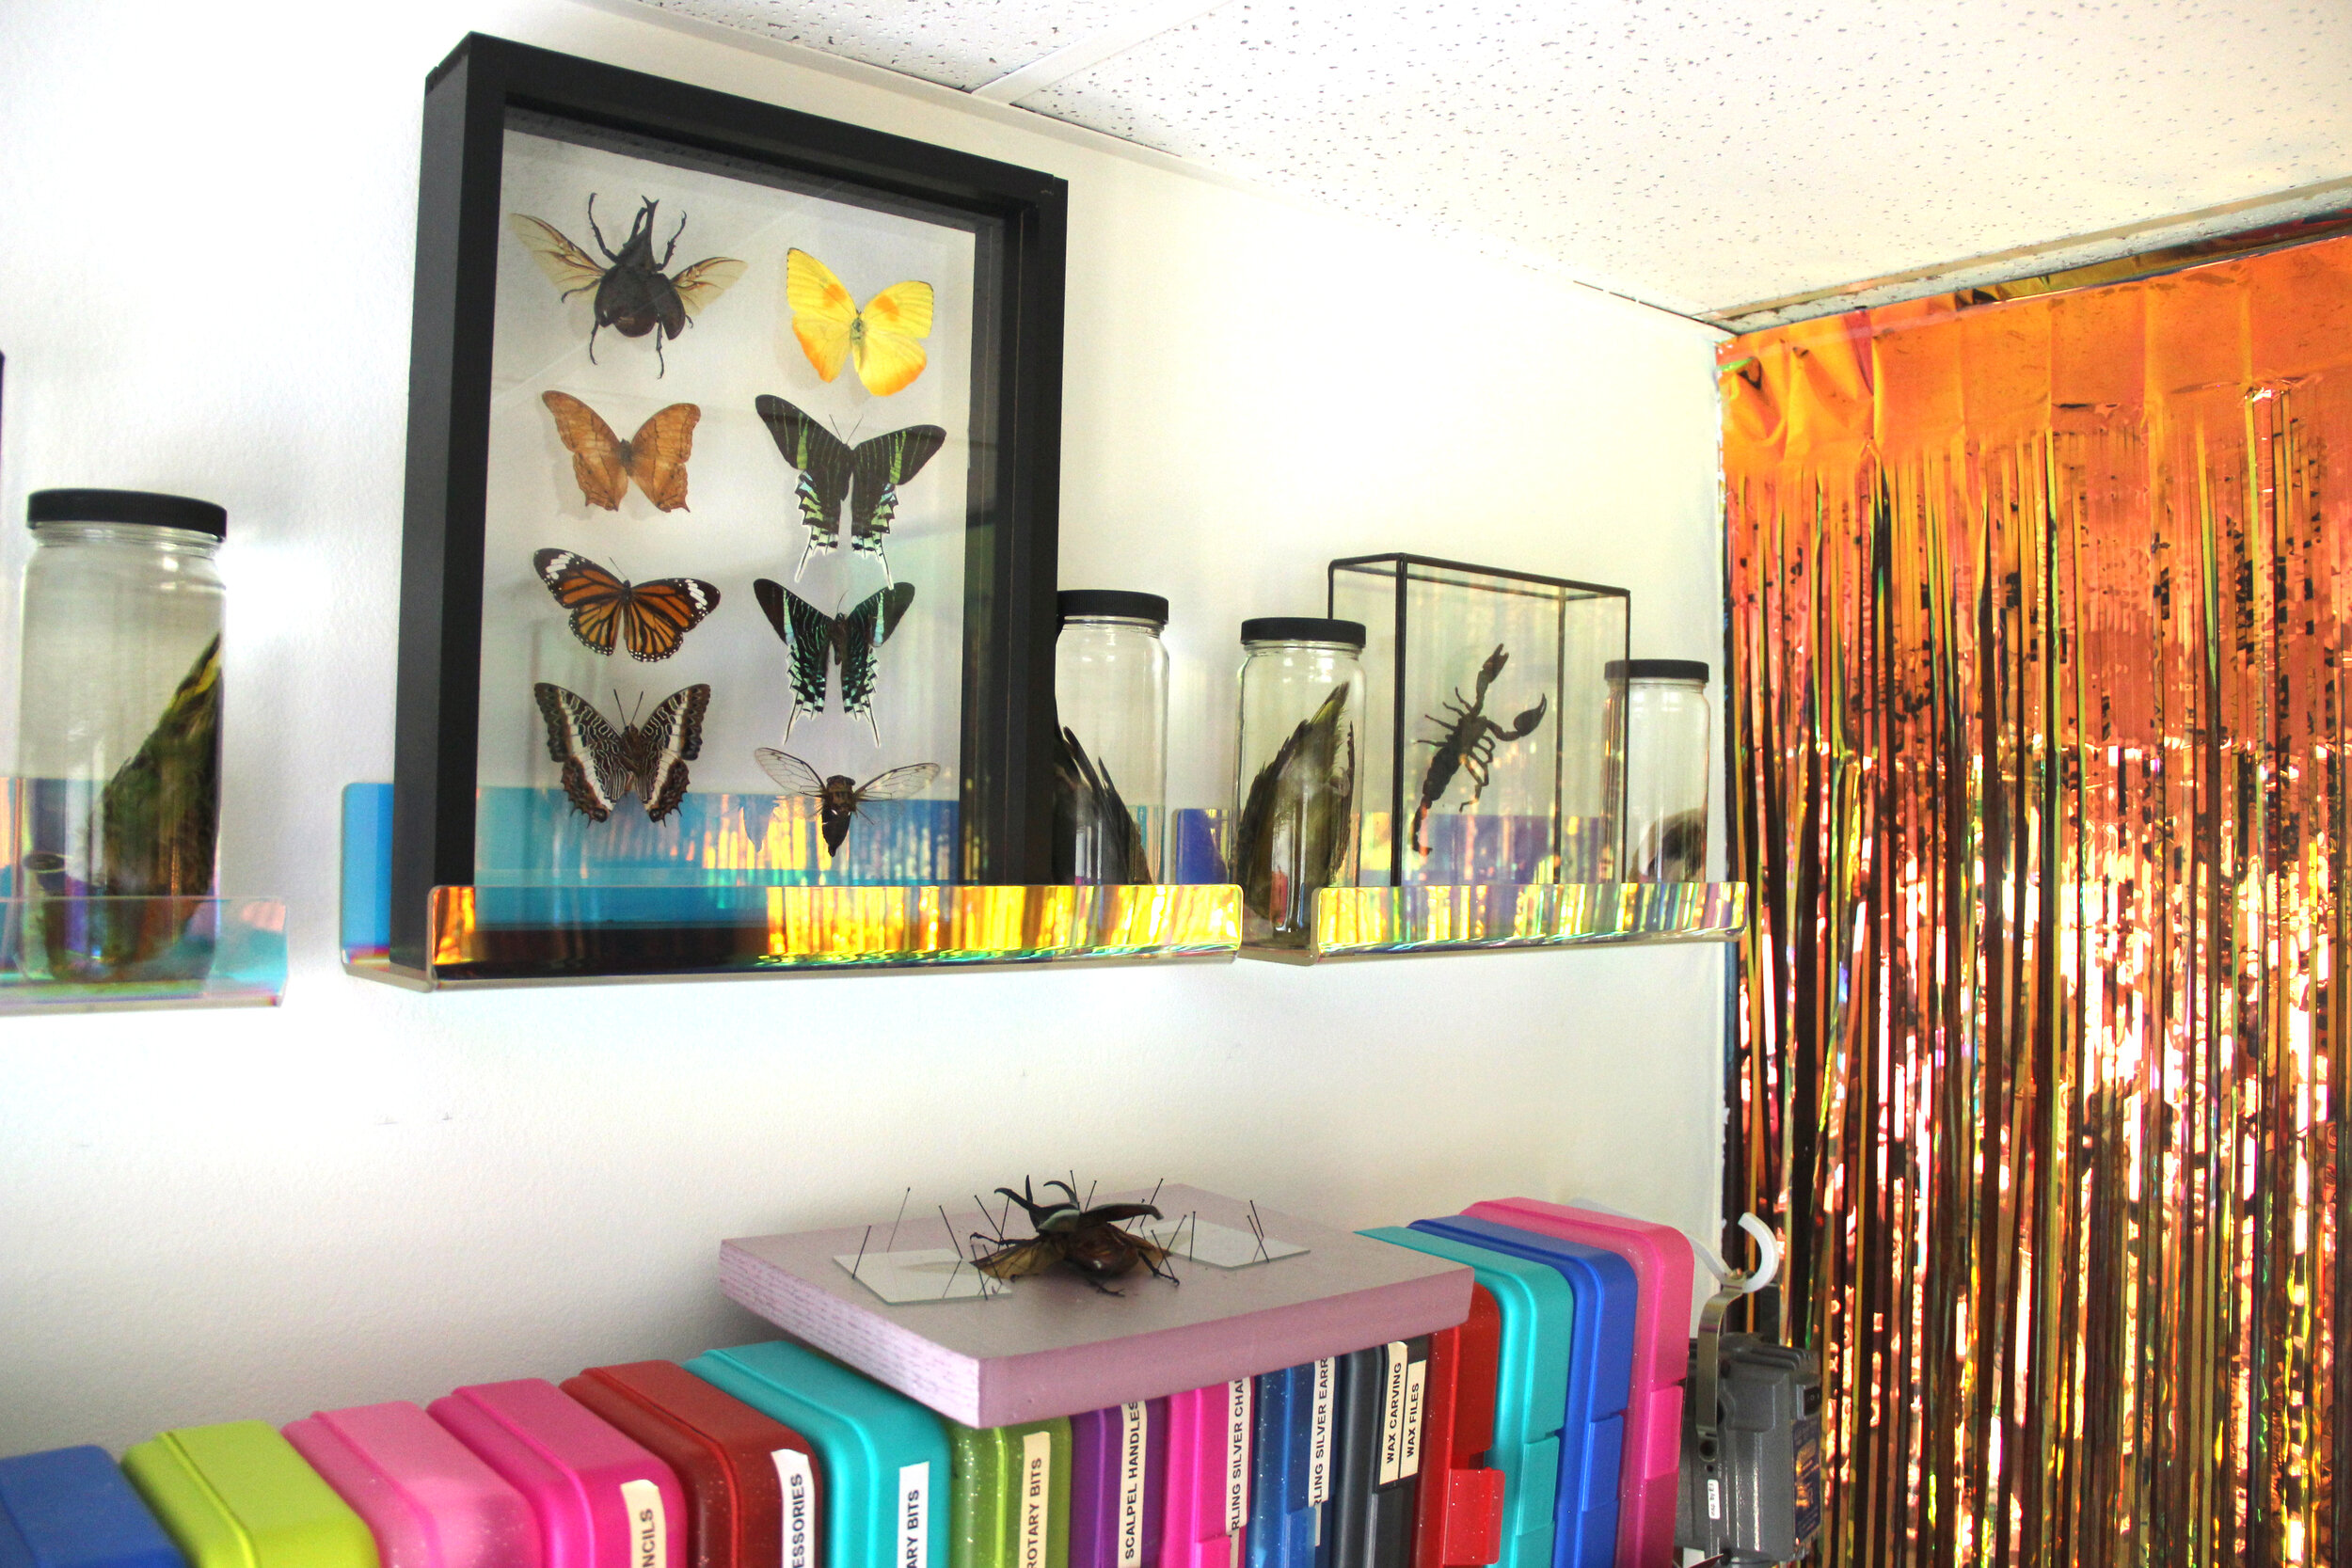
Adding clean-looking iridescent shelving to my north wall that matches my iridescent display risers from my south wall helps tie the room together. Not sure if you can tell, but I love things that cast a rainbow in their shadow! I installed a strong, adjustable curtain rod to hang macrame plant hangers (which come with appropriate hooks!) from, and I protect my plants from sunburn with budget cellular shades — I wasn’t about to drop serious coin on window treatments for a place that isn’t mine so I used Factory Direct Blinds.


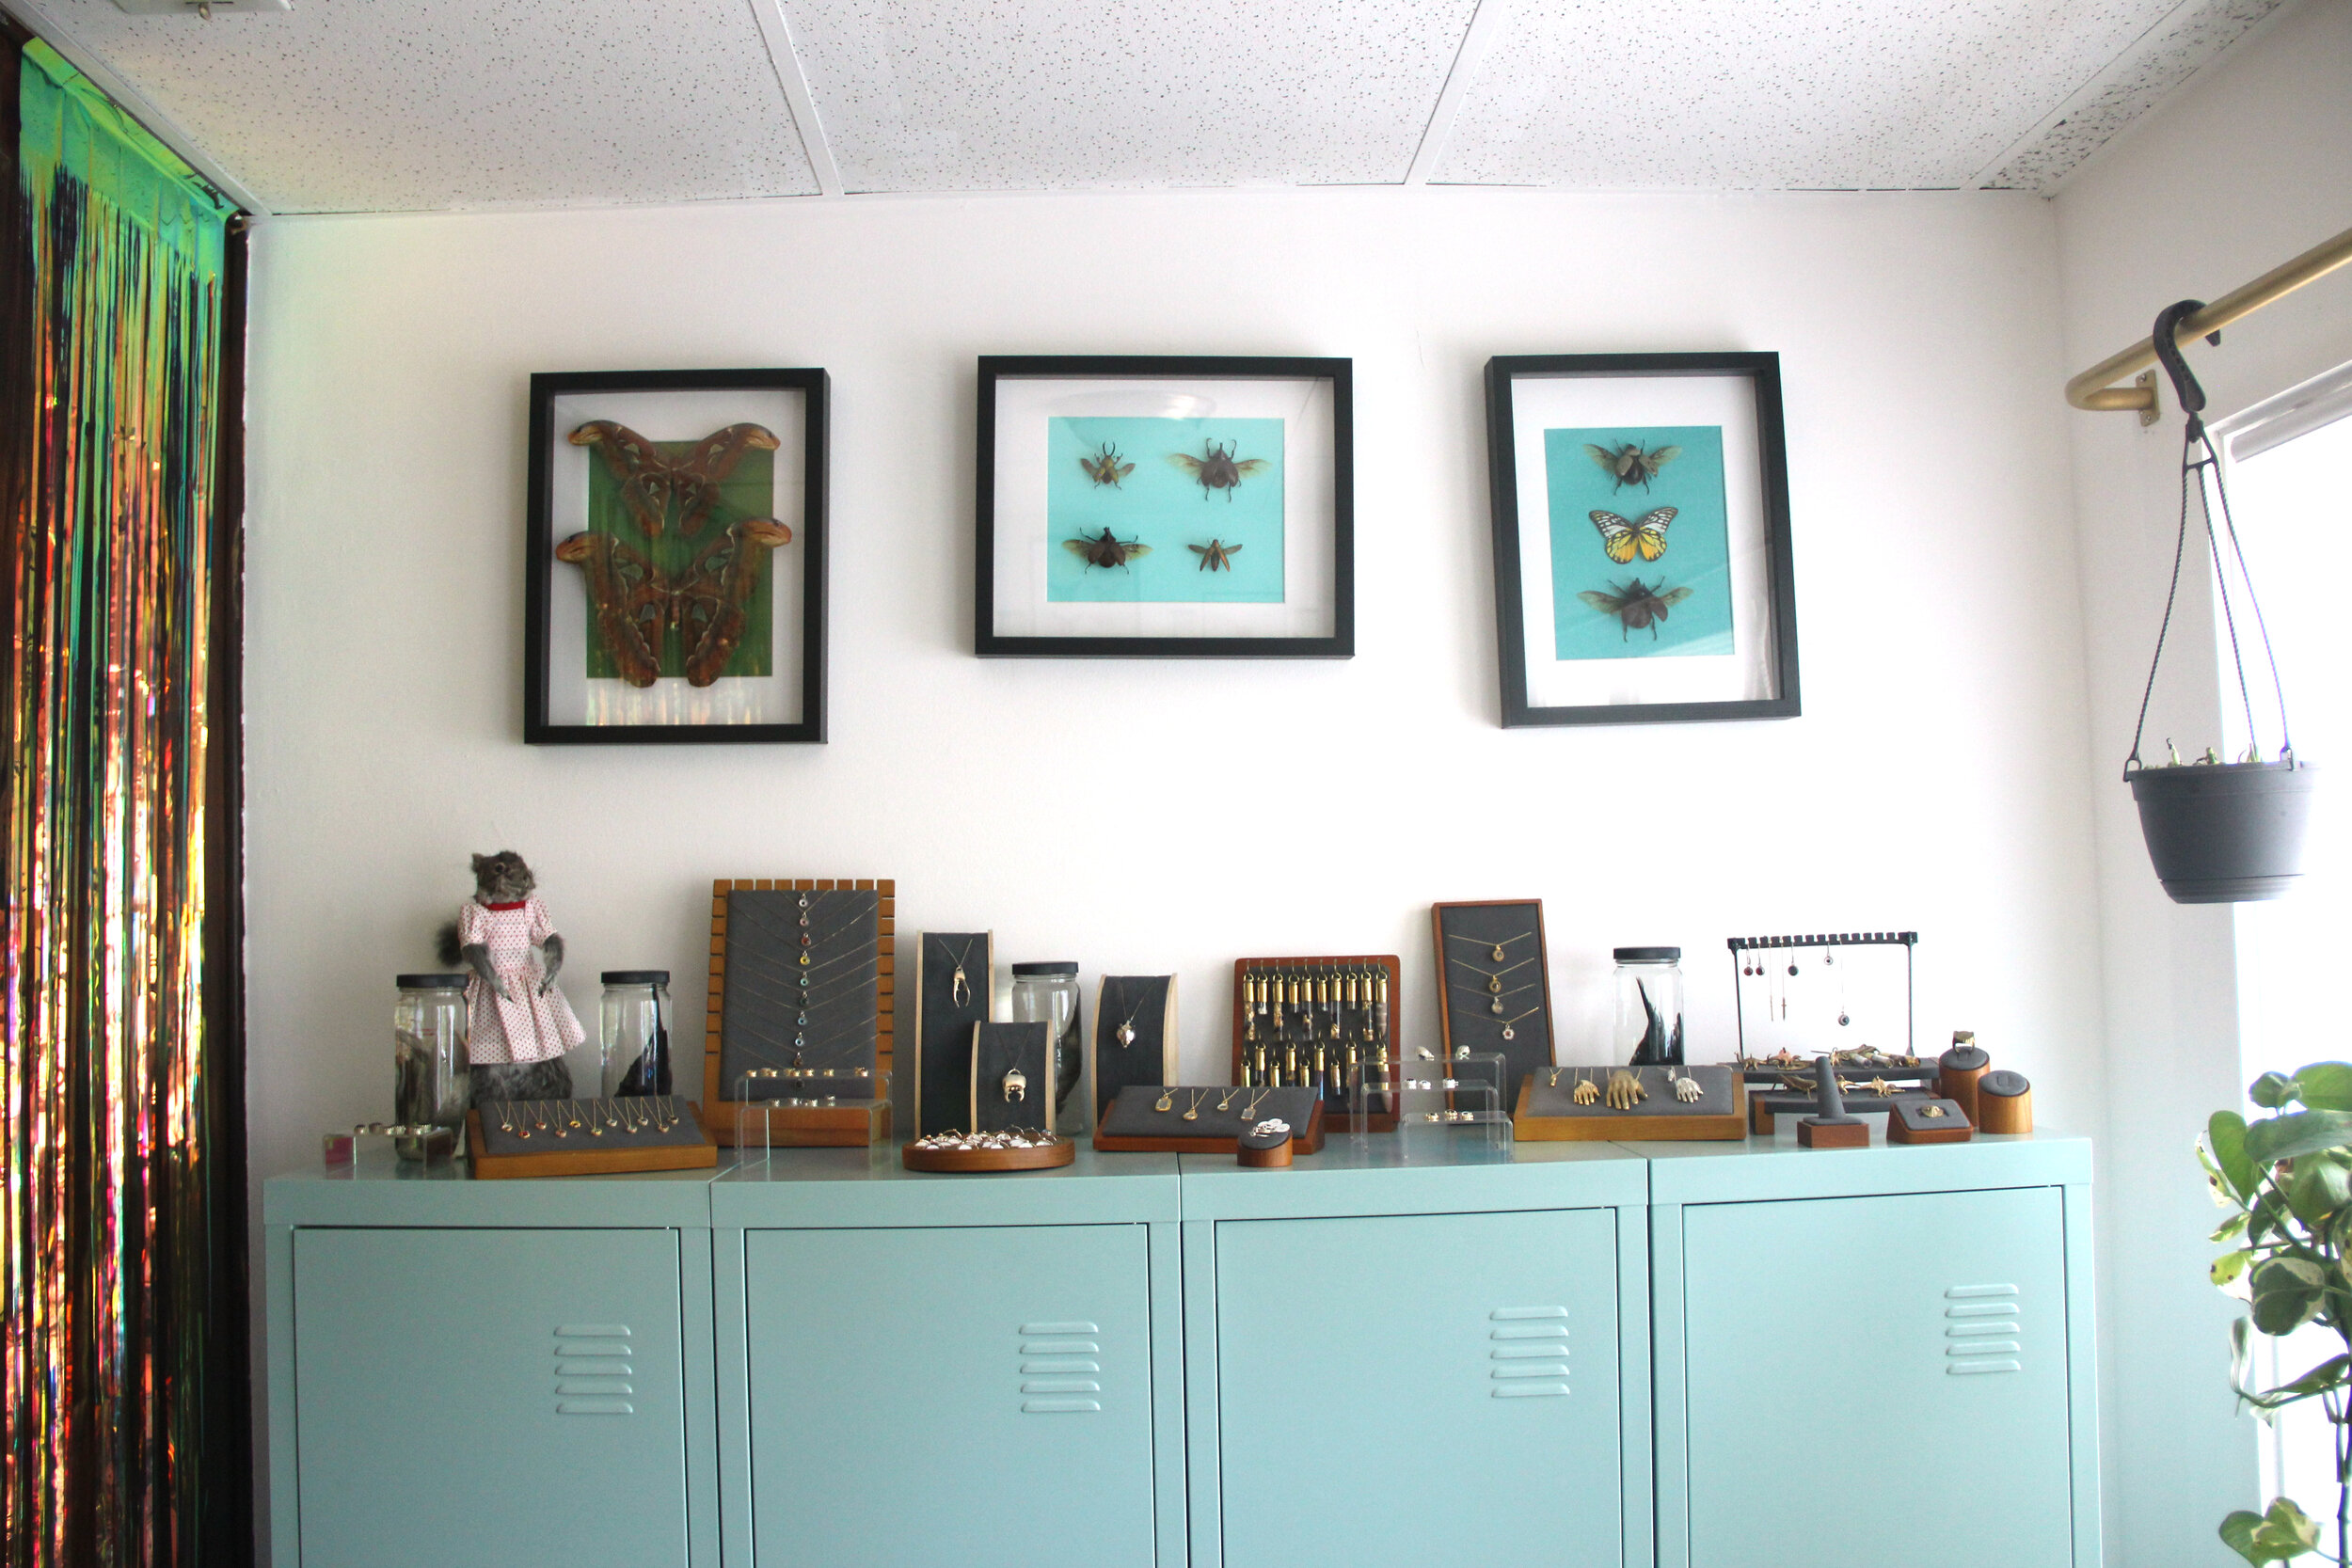
I used removable hangers made specifically for sawtooth hangers for these frames. I use a variety of jewelry display items which are sometimes available and sometimes not. The brand I like is called Oirlv and you can find it on Amazon and AliExpress to varying degrees. Here are a few links: necklace tray, wood risers, necklace display, ring display.
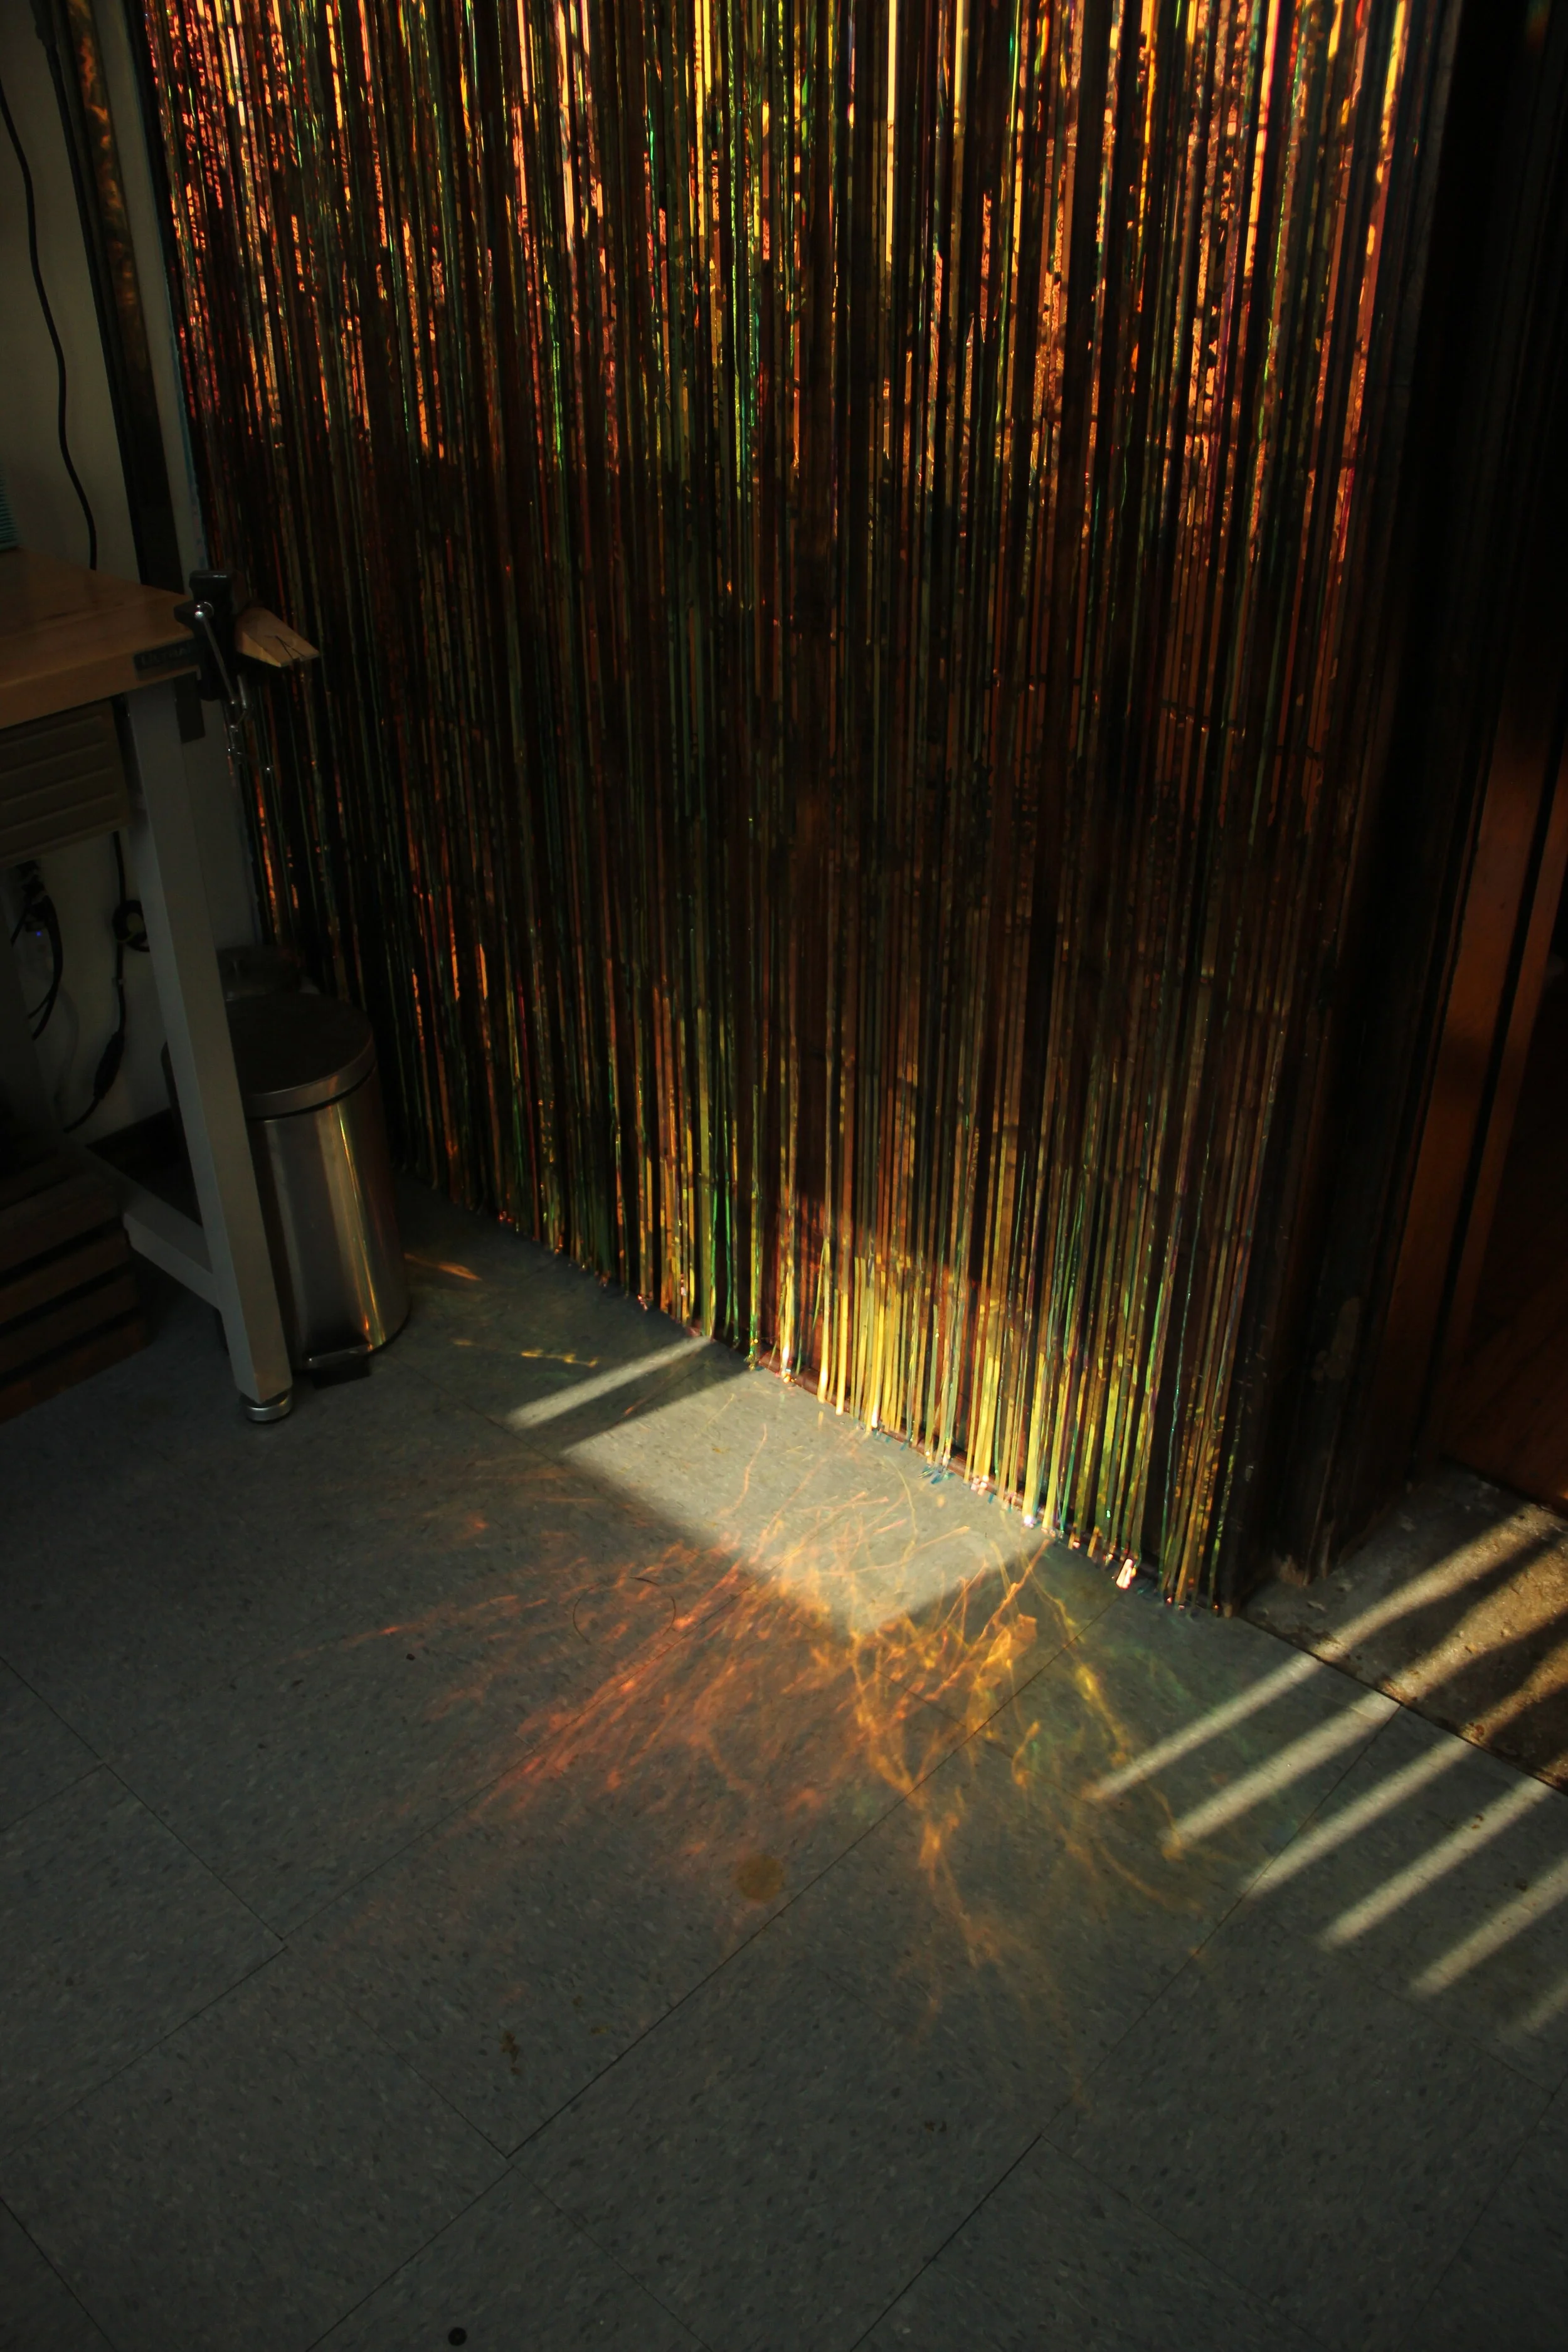

In the evenings, the sun streams through the west-facing windows and hits a my window sun-catchers and my iridescent wall covering just right, casting rainbows across the whole studio!

It feels so, so good to have a work space that suits my needs and which I actually WANT to be in! When the sun gets too bright, I pull down the shades and turn the whole room into a giant soft-box (gentle white photography lighting). It’s so nice!
Here is a comprehensive list of the items in my studio for those wishing to make a purchase.
Jewelry and insects are my work! Buy them right here! Custom order anything you want by using this contact form.
Workbench (Which I LOVE, it has a shelf and a lighted hood. Don’t read the reviews bitching about assembly. It’s not that hard. I am basically made of spaghetti and I did it by myself without any issue.)
Long power strip with flat plug to fit behind the lockers because I only have one outlet and it’s not where I want it to be
Cable clips to keep the power strip going where it needs to go
Lockers available in several colors. These are way less than Amazon with free shipping and there are quantity discounts when purchasing multiples.
The plastic pencil boxes are from Michaels, but they do not update the stock on their website and you have to visit a store to see what’s available.
The trash can is old, from Ikea
The chair is a bar stool from Target, the perfect height for this workbench. Other chairs felt way too small and/or uncomfortable.
I use a wooden crate under the foot pedal for my flex shaft to make it an appropriate height for my foot to reach. I think it’s from Michaels — again, old.
I think that’s basically everything but if you see something that I didn’t link, feel free to hit me up!
Insect & Invertebrate Specimen Repair Glue/Adhesive Comparison Guide
This is a comparison of all of the adhesives I keep in my studio for making repairs in my work. Entomology art is so fun to make, but insects (and other invertebrates) are fragile and sometimes accidents happen. Whether you received your specimen with a broken antennae right from your broker or you got really excited about a huge beetle and made your boyfriend take your picture holding it and you broke off two legs in the process (who, me?), you’re gonna need some glue. This post contains affiliate links.
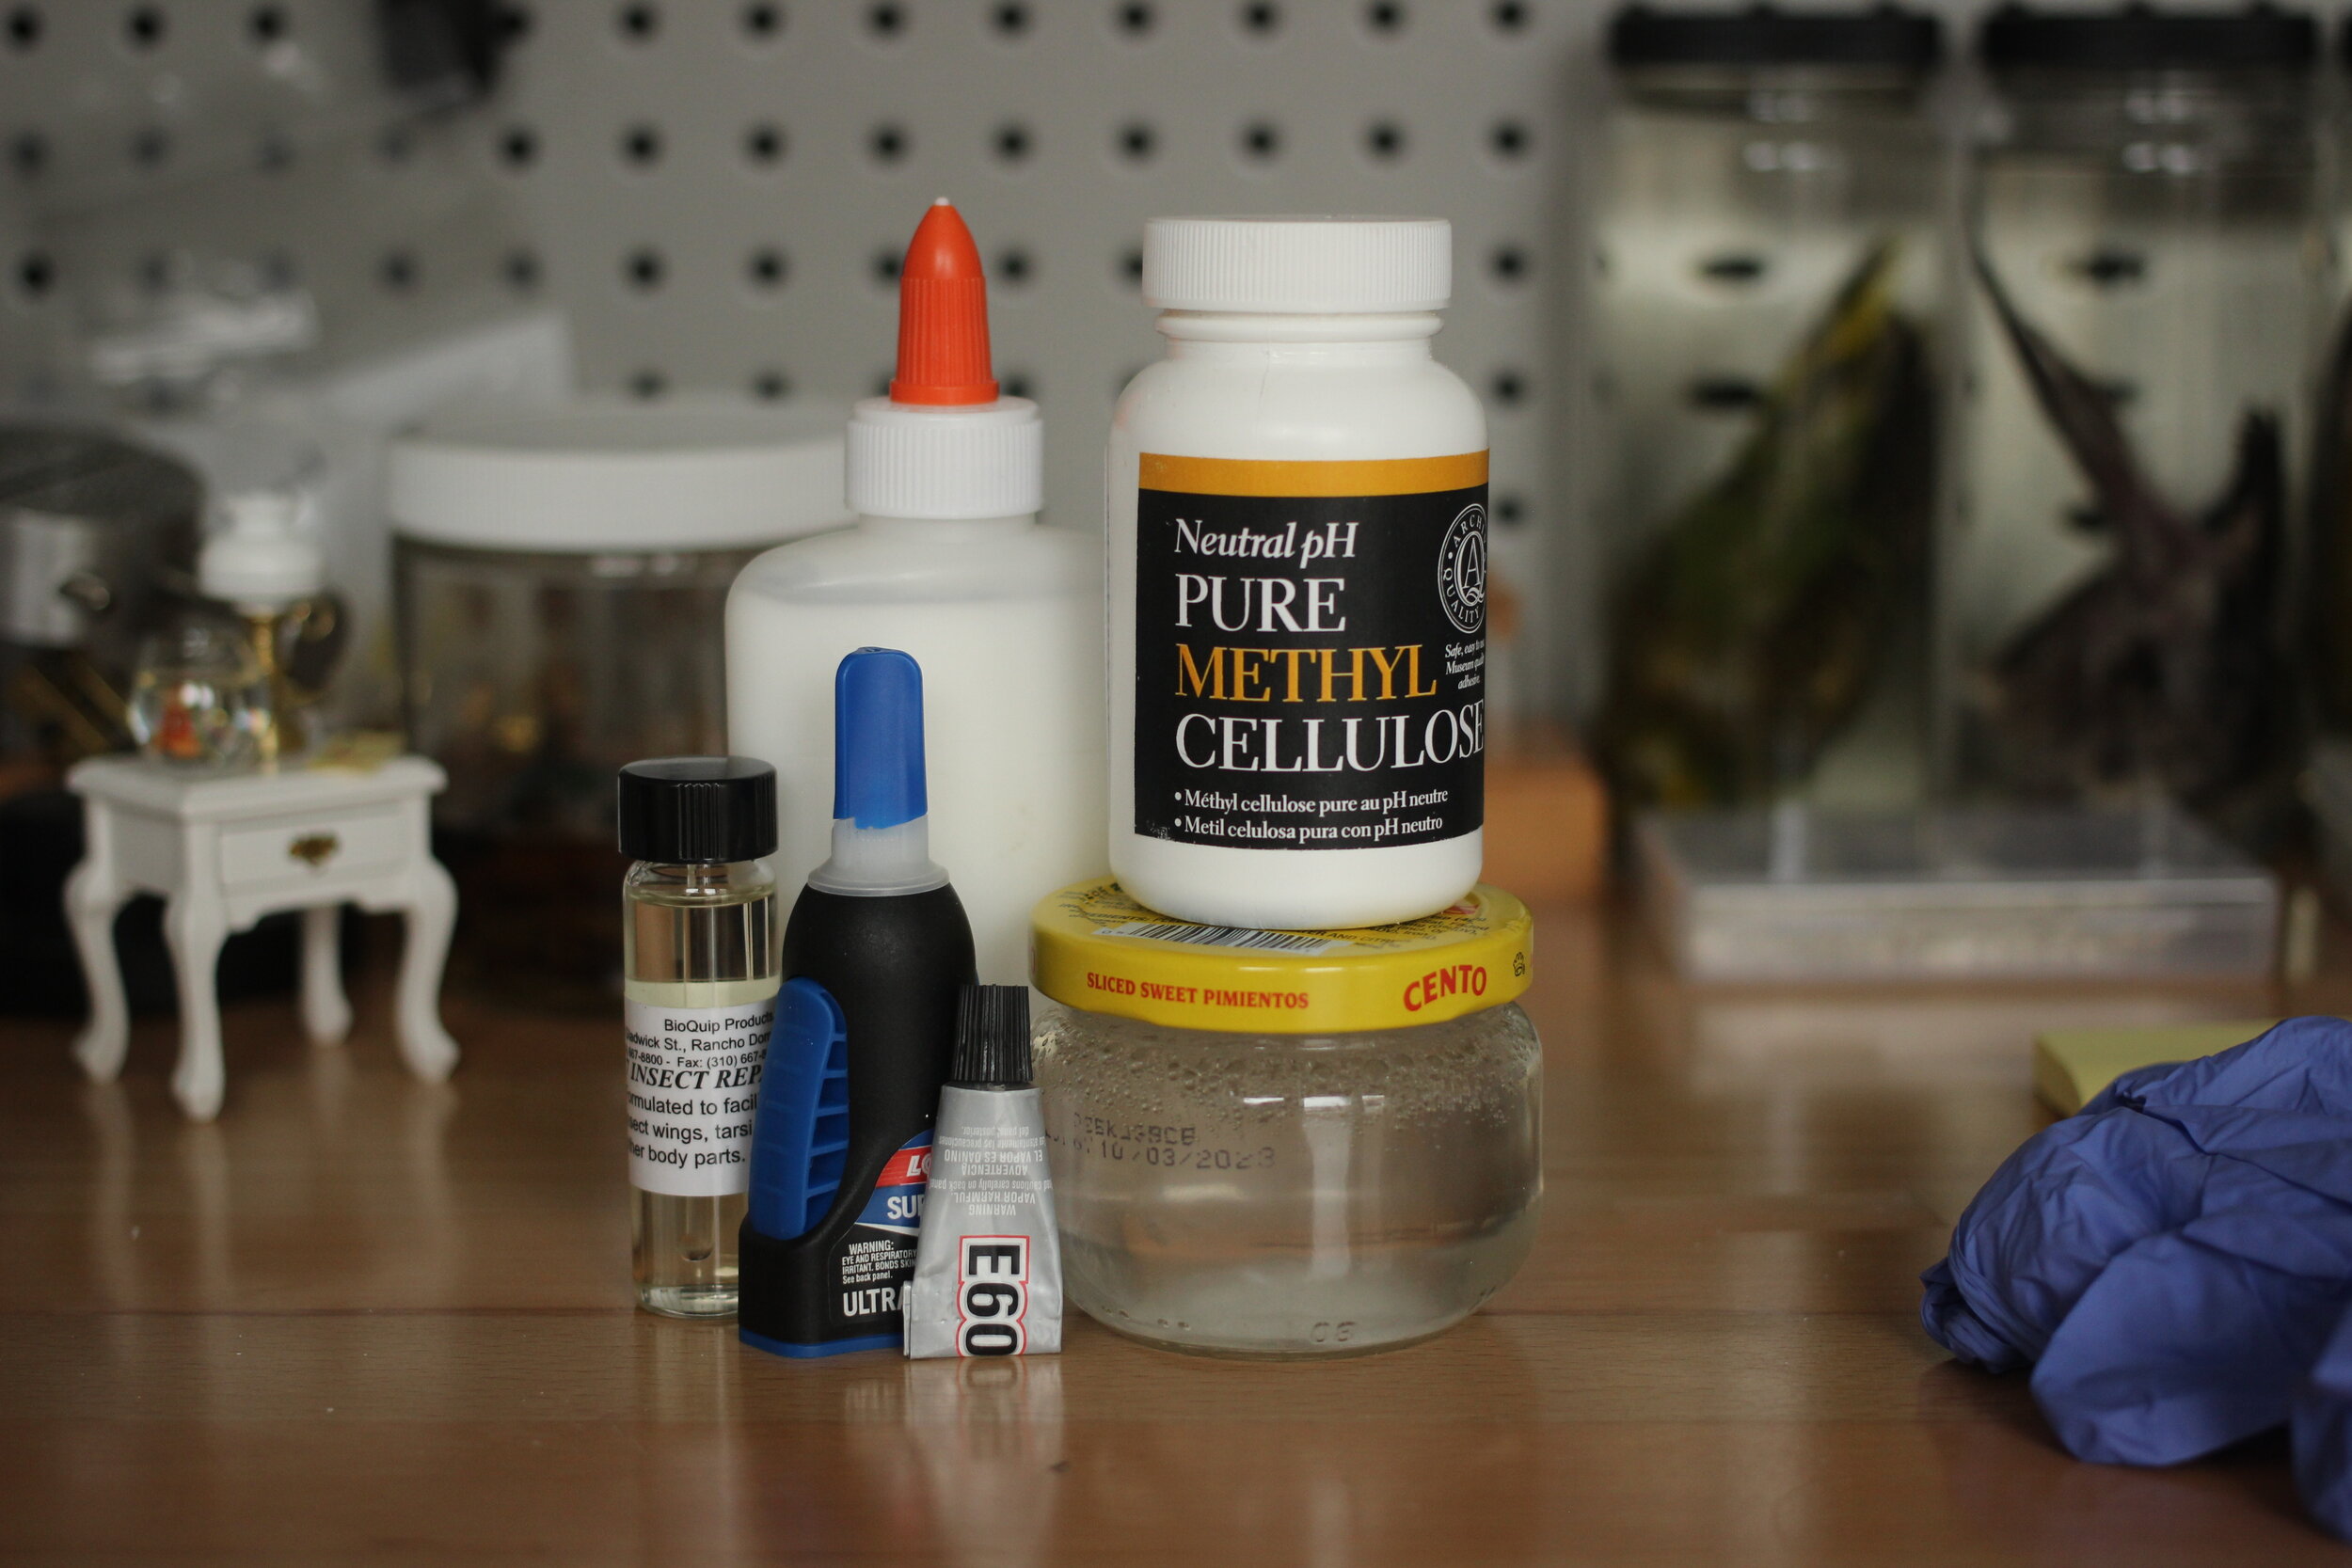
These are my five adhesives. I mixed the methyl cellulose in a pimento jar, and it lasts a long time.
These adhesives can be used to fix a butterfly wing, reattach a beetle leg, secure a cicada’s head back onto its body, and even if your insects are already perfectly intact these glues can also be used to put your specimen(s) into a shadow box!
I work in large batches and if specimens break I set them aside in my Dead Bug Hospital™ and then I do repairs in large batches. This worked out perfectly for writing this adhesive guide because I was able to use one right after the next for a great comparison rather than writing this from memory. Here are all of the insects I fixed.
I keep five glues in my studio right now. If I experiment with more I will add them to this guide. Without further ado, here they are. Reviews, notes, and more are below.
Now for the reviews!
Glue type: LocTite Gel, a brand of super glue (cyanoacrylate glue)
Consistency: Gel toothpaste, under eye cream
Odor: Acrid chemical smell
Application type: Comes in a squeeze bottle with a tiny applicator tip
Color when dry: Mostly clear with a whitish cast depending on the thickness
Reversible: No
Where to buy: Amazon, Michaels, hardware stores
Notes: Super glue comes in a number of consistencies but I always buy the gel kind so that I have control over the flow. This is the most caustic of any glues I will mention here and it dries very very brittle — so if you repair something but it gets bumped, it will snap again in the same spot but with the addition of dried glue. If you repair it a second time with super glue, it may be very noticeable. I would only use this glue for non-visible repairs, like attaching a head back onto a body. It works great for securing pins into shadow boxes but if I had the choice between this and E6000, even just for shadow boxes, I would choose E6000 every time. More on that below.
Super glue from any brand gives off fumes for a long while after application. Ensure that it has dried for quite a few days before sealing it under glass, because the fumes can bloom and create a dirty-looking cast on the inside of your glass. It’s easy to remove but wouldn’t it just be better to not have to do that in the first place?
Overall rating: 3/5
Glue type: BioQuip Insect Repair Adhesive
Consistency: Liquid, like watered-down dish soap. Just slightly more viscous than plain water.
Odor: Knocks your socks off, acrid chemical smell
Application type: Comes in a vial with a glass rod attached to the lid, the rod is the applicator
Color when dry: Clear and shiny
Reversible: No
Where to buy: BioQuip
Notes: This repair adhesive is PERFECT for small repairs. Torn wings? Yes. Detached antennae? Yes. Gotta fix some cilia? Yes. Use very sparingly. What I like to do is let most of the glue drip off the glass rod back into the vial and dab the tip of the applicator along the edges that need to be repaired until I can just barely see the adhesive. I use tweezers or forceps to replace the missing part in its correct position and blow very, very gently until the glue seems to hold on its own. It dries quite fast. This is a nice glue to have on hand for minor repairs of small invertebrates, but I would not recommend it for very large repairs because of the consistency. A more gel-like glue works better for large repairs because it has the volume to fill up cavities and stay in place, rather than dripping out. I would also not use this glue to secure any insects in their shadow boxes.
Overall rating: 5/5, will always stock this in my studio
Glue type: Lineco Methyl Cellulose
Consistency: Initially, powder. Once mixed, chocolate mousse, complete with airiness
Odor: Not noticeable at all
Application type: Brush
Color when dry: Clear
Reversible: Yes
Where to buy: Amazon
Notes: This is a very interesting adhesive. The container contains cellulose-based powder, which you mix with water according to the package instructions in a separate container. A little powder goes a long way so this glue is worth the investment. Leave for one hour or overnight and it magically turns into glue! This adhesive is acid-free and archival, originally formulated for creating and repairing books. Once mixed and left to set, the glue can be lifted out of the container on your brush in small pieces and pushed into the areas where you need it. It does not flow and does not have a liquid consistency at all. In my experience this is best used for larger repairs (missing heads, fallen legs from larger insects) rather than very tiny repairs given that it stays in place and will not flow smoothly to fill in gaps for repairs like antennae or small tarsi. I do like this adhesive a lot and it dries quite nicely, but remember the consistency of the original powder and keep in mind that this type of adhesive does not have shock absorbing qualities — I do not use this glue to secure insects in their shadow boxes.
Lineco Methyl Cellulose is reversible with water.
Overall rating: 4/5
Glue type: Elmer’s School Glue or Elmer’s Glue-All. See also: Aleene’s Tacky Glue.
Consistency: Runny, like melting ice cream
Odor: Old milk
Application type: Cap pops up, squeeze from the bottle
Color when dry: It says it dries clear, but it’s more like a milky color. There’s a milk theme here with this glue and if that grosses you out, I’m so sorry. To be fair it does have a drawing of a cow on the label (a variant of the character Elsie, because Elmer’s used to be owned by Borden) and used to be made from bovine and equine (cattle and horse) parts. You can read all about the strange history of Elmer’s here. Today it is made of PVA (polyvinyl acetate) and no animals are used in its production.
Reversible: Maybe, with water. The glue will soften and you could peel your parts away from each other and reattach if necessary. Keep in mind that this could become extremely messy.
Where to buy: Amazon, Michaels, and basically everywhere else in America. Even your grocery store probably sells Elmer’s in the office supply section near the paper towels, etc. so it’s easy to find in a pinch.
Notes: Elmer’s is an easy to find glue that is “good enough” to get the job done but it’s not amazing. As mentioned above, it does dry clear-ish with a white cast. This means you need to be quite sparing with it when it’s being used in a visible spot. It dries slightly flexible but still brittle. For the most success, squeeze out a “baby dot” of glue (the size of the head of a pin) and apply more only as needed. Wipe away excess before it dries if possible. I do not usually use Elmer’s for repairs unless literally nothing else is available. I do use it for securing pins into shadow boxes. If you do like the texture and are looking for an archival version, try finding rabbit skin glue made for bookbinding. Yes, it’s made from real rabbit skin.
Overall rating: 2/5
Glue type: E6000
Consistency: Thick gel, like silicone caulking or Vaseline
Odor: Mild chemical odor
Application type: Tube
Color when dry: Clear
Reversible: Not really, but you could try with acetone. Keep in mind the effect acetone may have on your specimen.
Where to buy: Amazon, Michaels
Notes: E6000 is my favorite glue and I have a lot of thoughts about it. While not considered to be archival, it is my favorite and I use it the most often out of all of my adhesives. It is very useful for making larger repairs such as attaching a head back onto a beetle or reattaching a cicada leg. It is not very useful for reattaching very small parts like antennae or mouth parts. The texture when it dries is somewhat soft, flexible, and rubbery. This is a positive attribute because this glue is shock absorbent compared to other adhesives — so if you ship your insects, or you move homes, insects repaired this way are much more likely to “survive” (that’s a joke because the bugs are dead) being jostled around on the journey.
E6000 comes in many sizes. At first glance, buying many small tubes seems more wasteful and less economical. However, this adhesive has a relatively short shelf life once opened. Even if you seal the cap completely, eventually the entire tube will harden into a weird gummy bear consistency which can still be squeezed out of the tube, it is slightly sticky but will no longer operate as an actual adhesive. For this reason, I choose to purchase the small tube sets and open one at a time. To create a very small opening, when I remove the cap I poke a tiny hole in the seal so only a small amount comes out at once. If I don’t use the whole tube immediately and it does the weird gel thing, I can just toss it and open a new small tube. If I did this with the large tubes I would be spending a lot more overall because I’d end up throwing away much more.
E6000 is easy to remove if you get it on your hands, just let it dry until it is tacky and then rub your hands together to get the glue off before washing. If you get E6000 on other surfaces and don’t notice until it dries, it can be cleaned off with acetone (check that acetone is safe to use on the surface you are trying to clean).
Once again, I repeat that this is not archival but will definitely last your entire lifetime. If I only have to fix something once, but there’s a slight chance it will erode from acid in 200 years, does it really matter if a piece of art I made for myself has a tiny bit of non-archival adhesive on it? I don’t think so. Long live E6000!
Overall rating: 5/5, will always stock this in my studio
Do you have an insect repair adhesive you like using that wasn’t mentioned here? Let me know in the comments, I would love to buy it and try it!
WET SPECIMENS: AN UPDATED POST (WITH A LITTLE HISTORY LESSON)
Way back in 2015, I wrote a general guide to creating wet specimens. After more than three years, and getting tons of questions, I have decided it is time for a sequel. I recommend reading through that post in addition to this one before you begin a wet specimen project. This will give you a good sense of the cost, risks, and realistic timelines for the process so you can decide if it’s something you would like to try. I offer many services, including making pet memorials or custom wet specimens, by request. Just shoot me a message!

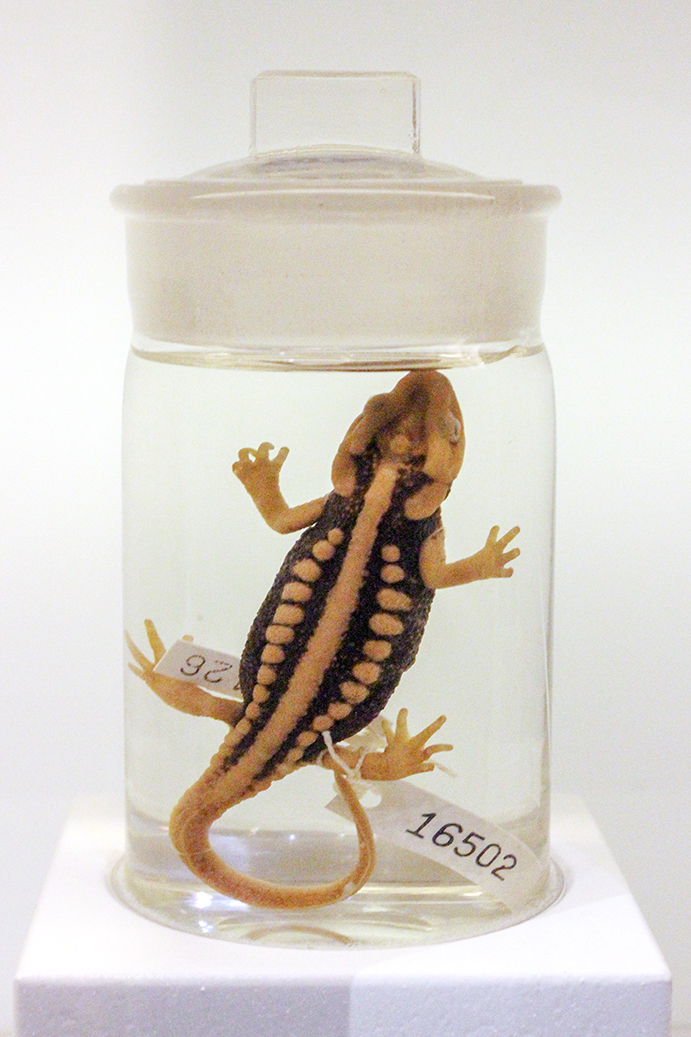
Veiled chameleon hatchling in vintage sanded glass specimen jar, part of my collection.
This post explains how to fully preserve wet specimens, including safety precautions and instructions for material disposal, using the exact techniques I use. I have yet to see any “tutorial” posted on Reddit or YouTube that properly and safely describes how to fully stop tissue decay and preserve a specimen that will last longer than a few years.
Fluid-preserved specimens, also popularly called wet specimens or embalmed specimens, are samples of biological tissue that have been preserved with a fixative and then stored in a permanent liquid solution in a jar or other receptacle. Traditionally only used in research settings, these types of specimens have become somewhat popular as home decor in the last five to ten years.
Before I delve into this, I want to teach you about the whats and whys of this type of preservation. Therefore, this post is split into a part one and part two. If you don’t care about the history of taxidermy and related practices at all, you can skip the first half, but it is my opinion that knowing about WHY taxidermy and preservation has evolved over time could help you be more innovative and successful in your endeavors.
PART ONE: A BRIEF HISTORY OF FLUID-PRESERVED SPECIMENS
THE BIRTH of fluid-preserved specimens

Frederik Ruysch
Here’s a little background for the history buffs: The practice of embalming small animals and their parts is widely accepted to have been started by Frederik Ruysch in the 1600s. Born in 1638, Ruysch studied anatomy but quickly realized that cadavers for study were expensive and difficult to procure, so he started to brainstorm his own methods for preserving bodies in order to make them last longer during the dissection process.
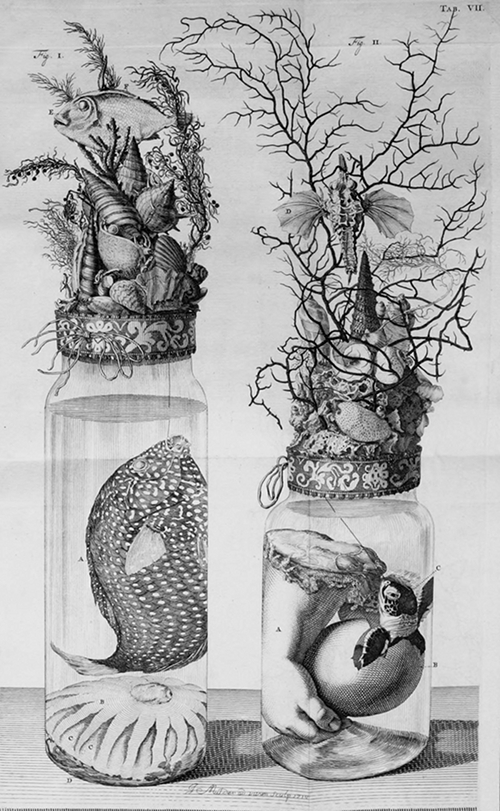
Illustration of several Ruysch specimens from the Public Domain Review.
Ruysch used alcohol-based serums for preservation and tweaked the formula over time. He took several decades to finalize the recipe, but eventually came up with something he called liquor balsamicum. The composition of the solution itself was not revealed until the year 2006, when an embalming researcher named Erich Brenner revealed that it contained clotted pig’s blood, Berlin blue, and mercury oxide or mercuric sulfide, a red mineral. Yum.

A depiction of one of Ruysch’s displays, featuring infant skeleton’s weeping into handkerchiefs, as featured in Alle de ontleed- genees- en heelkindige werken…van Fredrik Ruysch… vol. 3 – Source.
Not only did Ruysch pioneer the field of arterial embalming, he made it possible for students to learn from cadavers year-round. Prior to the practice of embalming, specimens could only really be used during colder months due to the stench caused by bacteria in the summer. Additionally, he worked to train midwives on proper practices.
By the time he turned 24, Ruysch had started his own museum that contained skeletons, mummified organs, fluid-preserved specimens, and also had a collection of intricately-decorated jars in which he kept specimens. Many of the specimens he kept were human infants and fetuses, which he purchased from midwives (with whom he worked) when they experienced a loss. In addition to preserving the fetuses in jars, he also embalmed and mummified them and posed them in still-life dioramas. His daughter helped soften the mood by decorating with flowers and shells.
Ruysch gathered significant momentum with his work and sold the entire collection to Peter the Great in 1717, along with the recipe for the preserving liquor.
Some of the preserved collections have held up over time, but the dioramas are no longer intact. What is left can be viewed in person (or online) via the Kunstkammer of Peter the Great in Leningrad Academy of Science.
MODERN applications of fluid-preserved specimens
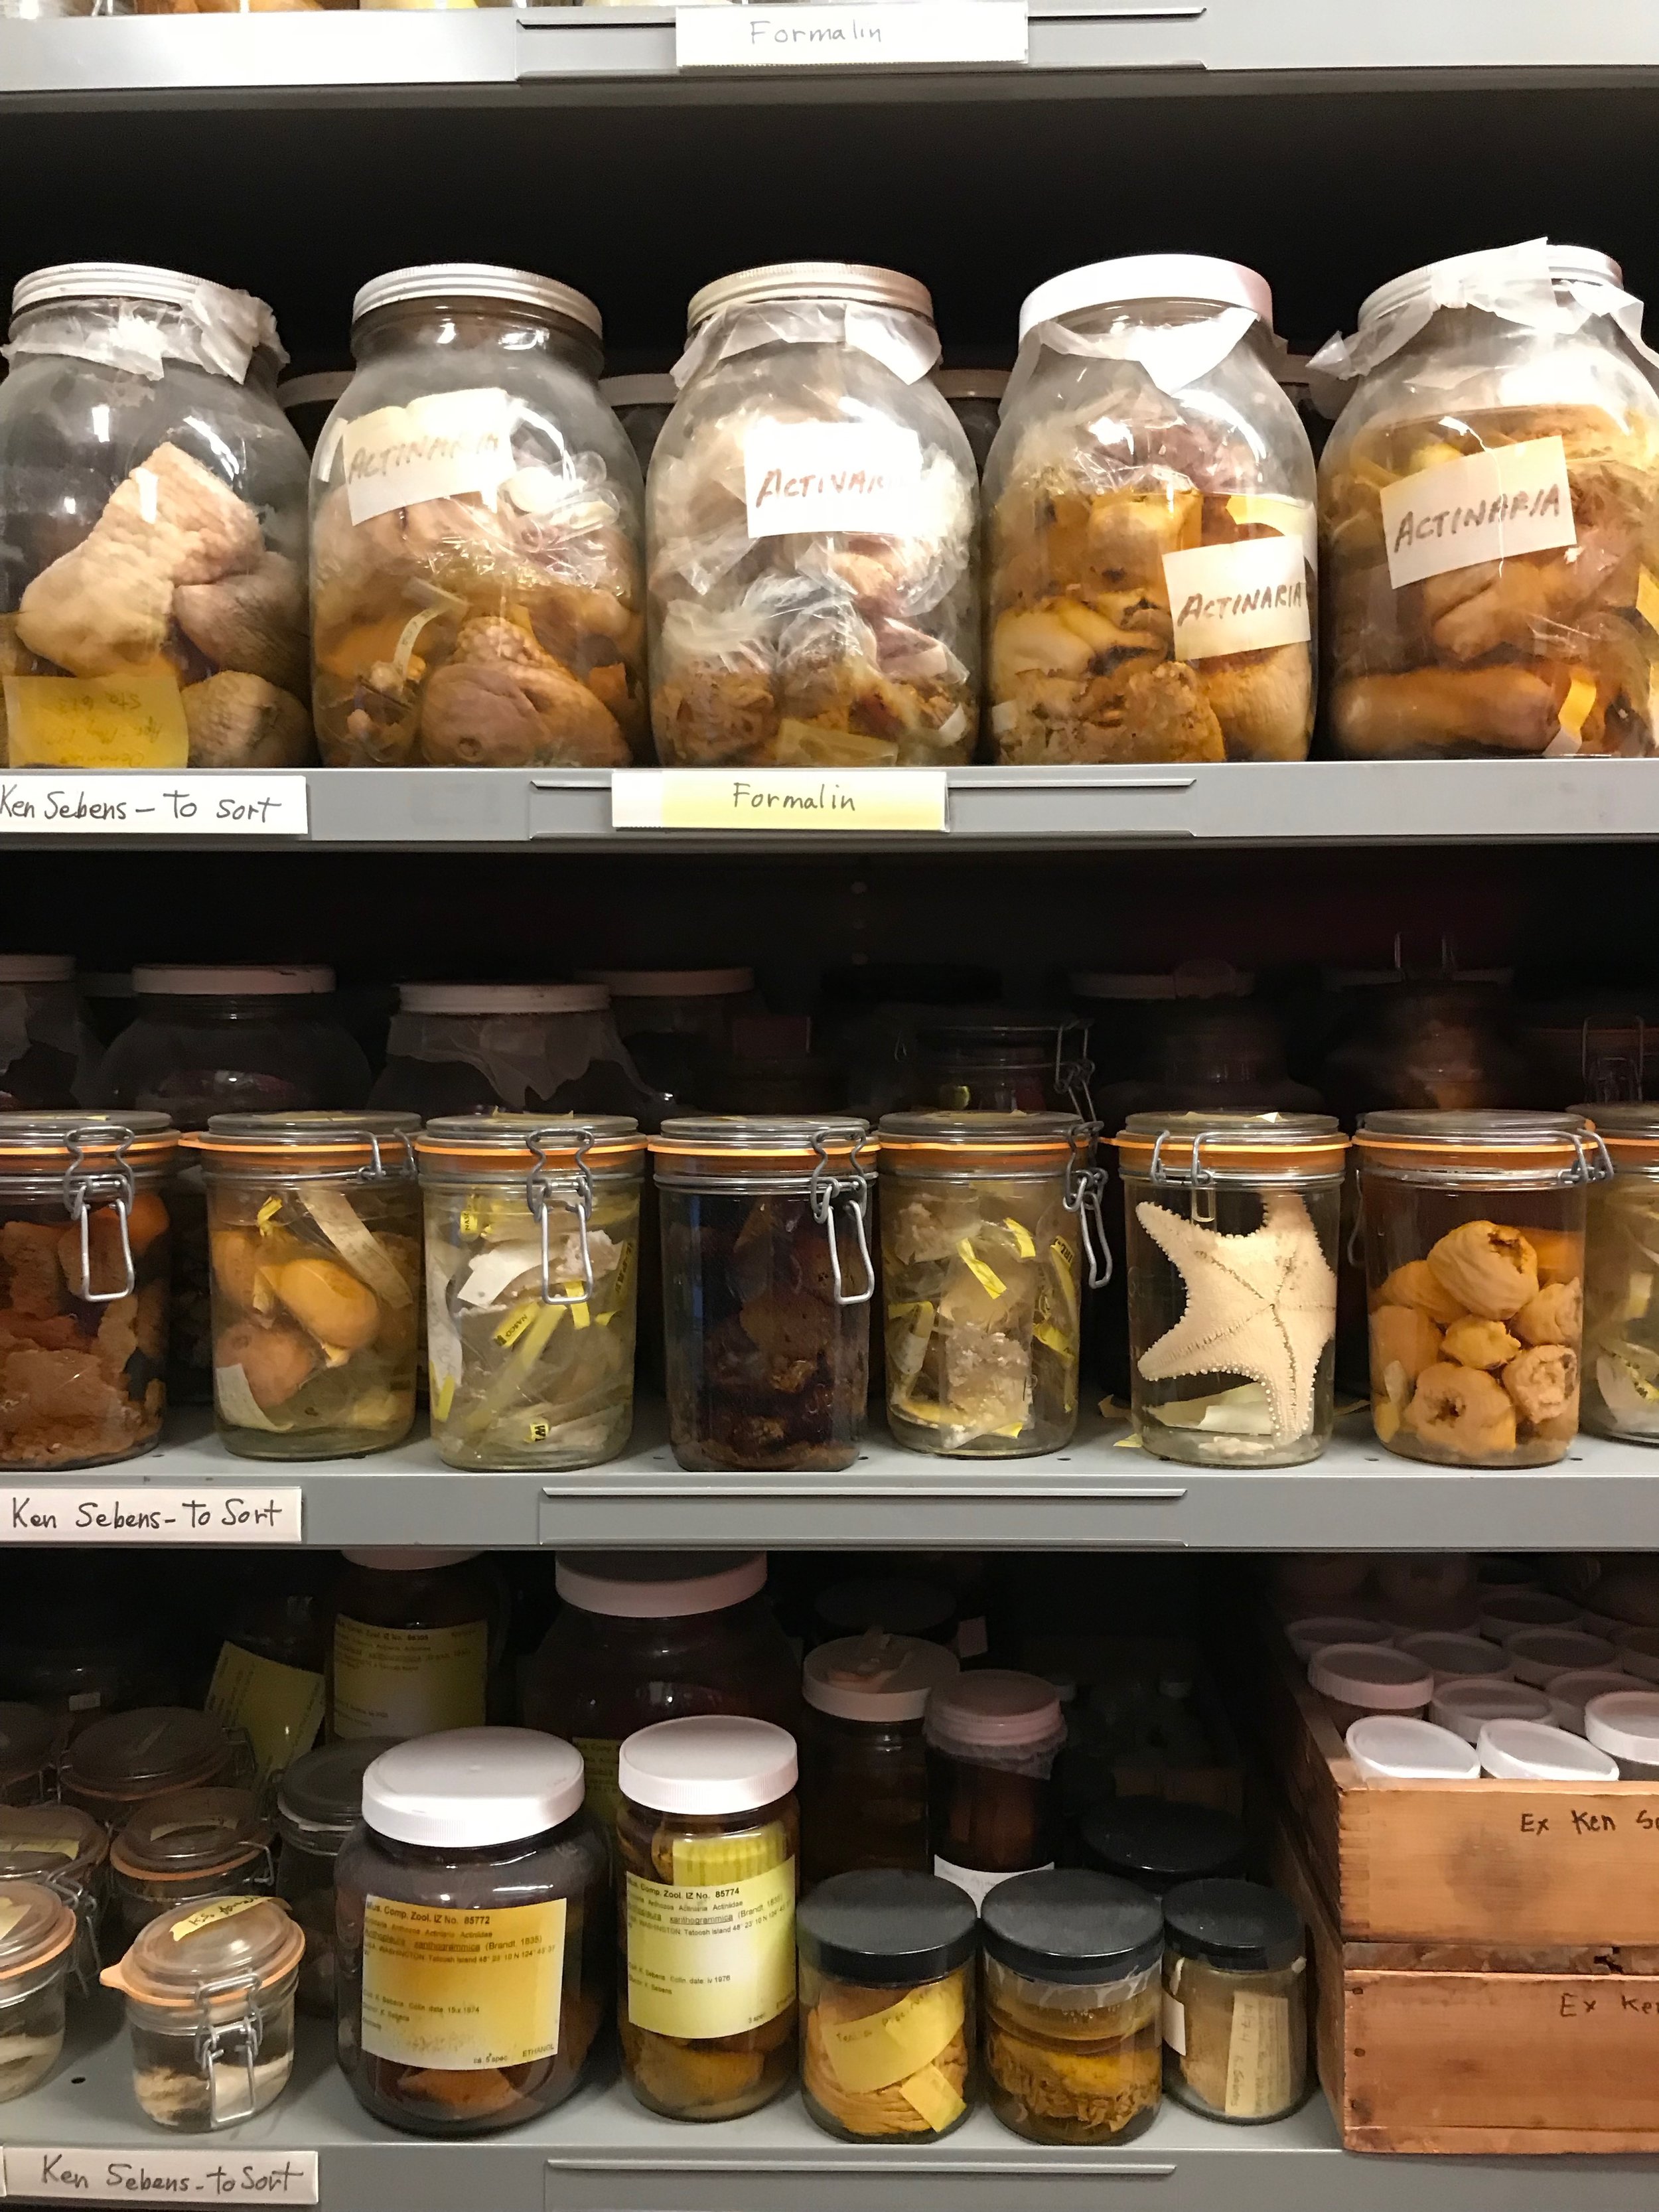
Nearly every school, university, and natural history museum on the planet has fluid-preserved specimens. If you’ve ever dissected a specimen like a frog, pig, cat, or eyeball in biology class, it was preserved using fluid - you just may not have realized that it was a wet specimen since it probably was given to you on a tray instead of in a jar.
Typically, fluid-preserved specimens in museums are referred to as “alcohol collections” or “ethanol collections” and they are just that - stored in alcohol. Because of their flammability, these types of collections are typically kept in fireproof rooms in the underbellies of museums, with thick doors that automatically seal at the sign of fire.
Specimen I photographed on display in the California Academy of Sciences.
Each specimen has its own scientific value, but as in any type of specimen collection, having multiple specimens dating across several years or decades can be extremely useful to researchers. Specimens in collections should always be labeled with the species, the name of the person who found it, cause of death, location of death, the date, and the name of the person who preserved it.
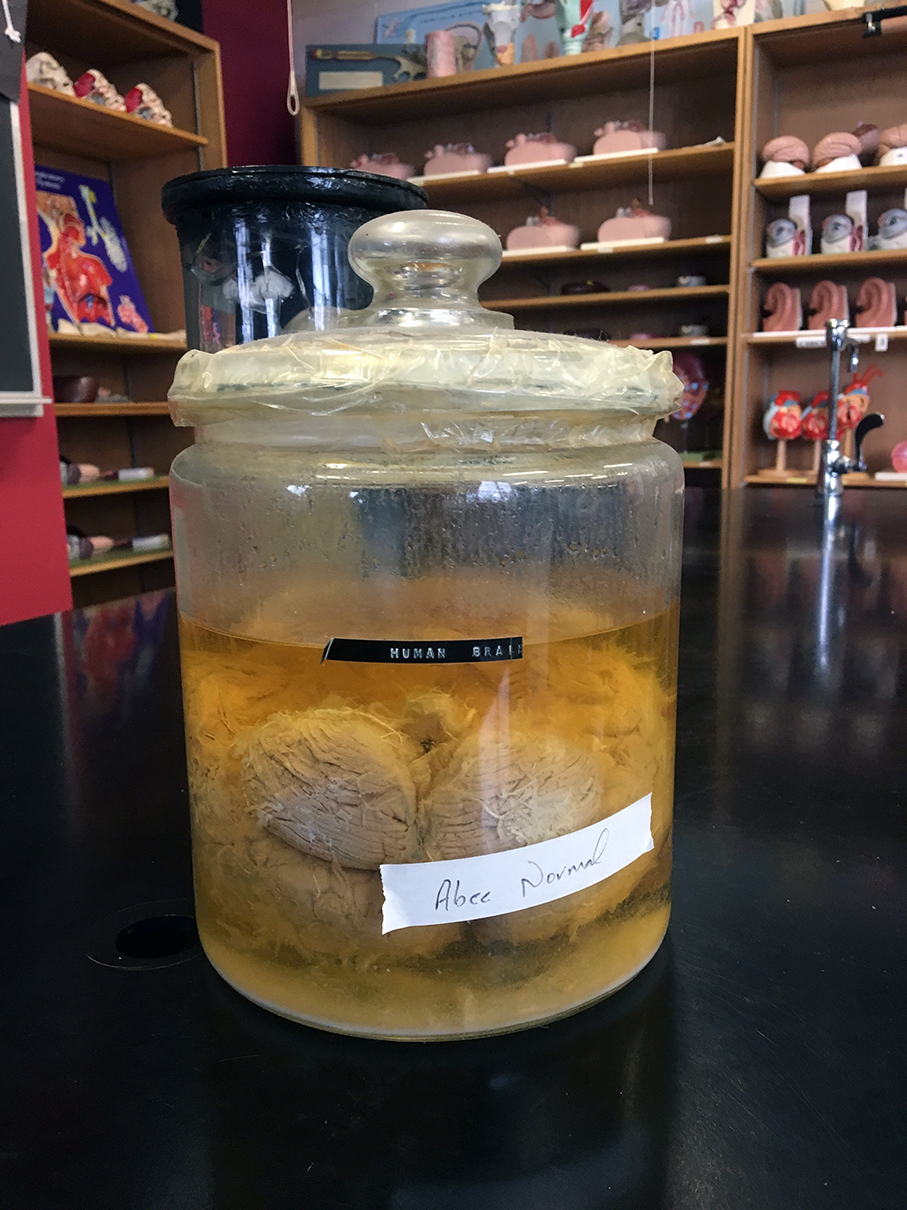
Human brain specimen, which I will be teaching students how to restore, in the collection of St. Xavier University.
Other information could include tissue samples, taken and put into a deep freezer with a corresponding identification number on the tag, and for certain animal groups scientists will also record things like the animal’s sex, weight, certain measurements, stomach contents, and even things that change with age or time of year such as eye color and molting status. These should ALWAYS be written with indelible ink. Don’t use an alcohol-based ink (like a Sharpie) if you are submerging the tag in alcohol. Jennifer Lenihan Trimble of the Harvard Museum of Comparative Zoology recently devised a great way to avoid label degradation over time: thermal labeling with a thermal sticker printer!
So what is all of this information and all of the tissue actually used for? Scientists can do DNA sequencing on old specimens to detect changes in species over time, and sometimes through this type of genetic work they are actually able to identify completely new species that had never been described before! Because researchers have been collecting specimens for hundreds of years, there are extinct species that lie within museum walls. Theoretically, it may eventually become possible to clone animals like the Passenger Pigeon and reintroduce them into the wild, should it fare well for the ecosystem at the time this practice becomes possible. All of the information contained in specimen collections allows researchers to learn as much as they can about every single type of animal, from mollusks to elephants, to keep existing populations safe and thriving so that our most precious endangered animals don’t become extinct.
I’m sure you’re thinking, “We get it. Tell us how to preserve our own specimens!” and I hear you… here goes!
PART TWO: HOW TO PRESERVE SPECIMENS IN FLUID
I did make a general tutorial several years ago, with a plethora of suggestions and possibilities for materials, but this is specifically what I do when I work on specimens myself. First you will want to gather your materials. Keep the specimen in the freezer until you have everything you need. Again, make sure you read this ENTIRE tutorial before you start. It’ll help keep you safe. This post contains affiliate links.
You will need the following:
A specimen
Respirator filters rated for formaldehyde safety
Safety goggles (not glasses, glasses don’t protect you from gas/fumes - the pair linked WILL fit over your regular glasses if you wear them)
Extended-cuff nitrile gloves (to protect your wrists too)
A syringe
A sharp needle (if you can’t find them online, ask your vet for Luer lock needles)
Paper towels
A puppy pee pad or a tray
10% buffered formalin
A borosilicate (that just means glass) jar with a fully-sealing plastic or metal lid, large enough to fit your specimen without squishing it too much (I like salsa jars and kombucha jars)
70% ethanol or isopropyl alcohol
While the process of actively injecting the specimen takes less than ten minutes, even for beginners, keep in mind that you will need to allow at least two weeks for fluid transfer to occur before you can transfer the specimen into its final storage solution.
Some of these links are affiliate links, which means that if you purchase something using these links I may receive a small commission (around 3% of your total). This is at no additional cost to you and the pennies I receive add up and allow me to continue publishing tutorials like this. Thank you for your support.
Sourcing your specimens
I adhere to a model of sustainability in my taxidermy. What I mean by this is that ethics are subjective, so I don’t like the phrase “ethical taxidermy” because every person has their own ethical guidelines. Hitler had his own moral code and so did Mother Theresa, and for this exact reason I developed sustainable taxidermy.
If you don’t care where your specimens come from, that’s on you… but remember that even if something falls within your personal code of ethics, it may not be legal to possess certain types of animals in general or without special permits. You may find these blog posts helpful:
Part of the invertebrate collections at MCZ.
As far as procuring specimens, if you don’t already have a particular item in your freezer, there are a variety of ways to get your hands on something. People constantly accuse me of killing animals for my work but reality is that all living things die eventually. I never have and never would kill something just to stick it in a jar. Anywhere you can imagine animals die, they do… farms, breeders, getting hit by cars, hunting, trapping, pet stores, you name it. Once you find a connection with someone who works in a related field, you’ll soon have your hands on a specimen. If you’re looking for something just to practice on, I would recommend contacting someone who breeds small mammals for snake food. If one of those mammals (like a mouse) dies of unknown causes, it’s unsafe to feed to a snake (if it died from illness, it could make the snake sick) and will usually just be thrown out. This is your chance to give “life” to something that would otherwise be discarded.
Make sure what you are doing is LEGAL. I can’t stress this enough. Research wildlife parts laws in your area and DO NOT, under any circumstances, violate bird law. The Migratory Bird Treaty Act of 1918 goes hand in hand with bird protection laws in many other countries up and down the path where most North and South American birds migrate, and you could end up in big trouble if you possess so much as a feather from any protected species. In a majority of U.S. states it’s not legal to collect roadkill without a special educational permit, and you can’t hunt without a license either. Each city, state or province, and country has its own laws governing the possession and use of wildlife and their parts, so bone up on that legal knowledge to make sure you aren’t in violation of anything.
Now that you’ve procured a specimen safely and legally, let’s talk about the steps of preservation.
SAFETY PRECAUTION ALERT!!!
You will be using formalin for this project. Formalin is an aqueous solution (meaning that particles have been dissolved in water) consisting of formaldehyde and water. FORMALDEHYDE IS FLAMMABLE AND CARCINOGENIC. I do not recommend that you work on this project without wearing a respirator. Do not work on this project in the vicinity of anyone not wearing a respirator who has not consented, and never do this type of work around any children or living animals. This is best completed in a room which you can close off, complete your project, and ventilate after leaving. For instance, I wear a formaldehyde-safe respirator mask and work in my studio. I lock my pets out, complete my projects, and open the window before leaving the room for several hours to allow everything to air out.
OSHA guidelines state that it is safe to have up to 15 minutes of unprotected exposure to formaldehyde per day. I do teach this method in my classes but I adhere to these guidelines and try to keep it to 5 minutes or less just to err on the side of caution. Formaldehyde can cause cancer and birth defects. DO NOT WORK ON ANY FORMALDEHYDE-RELATED PROJECTS IF YOU ARE PREGNANT OR TRYING TO BECOME PREGNANT. Your baby will be born with deformities and illnesses. This is not a joke.
So long as you take safety precautions, you’ll be fine.
Wear a respirator with fresh filters and a pair of safety goggles (not glasses, you want them to seal to your face and protect your eyes from the gas). Always wear gloves and always get fresh gloves if you need to de-glove for any reason.
As long as you’re safe, these are the steps to creating a wet specimen:
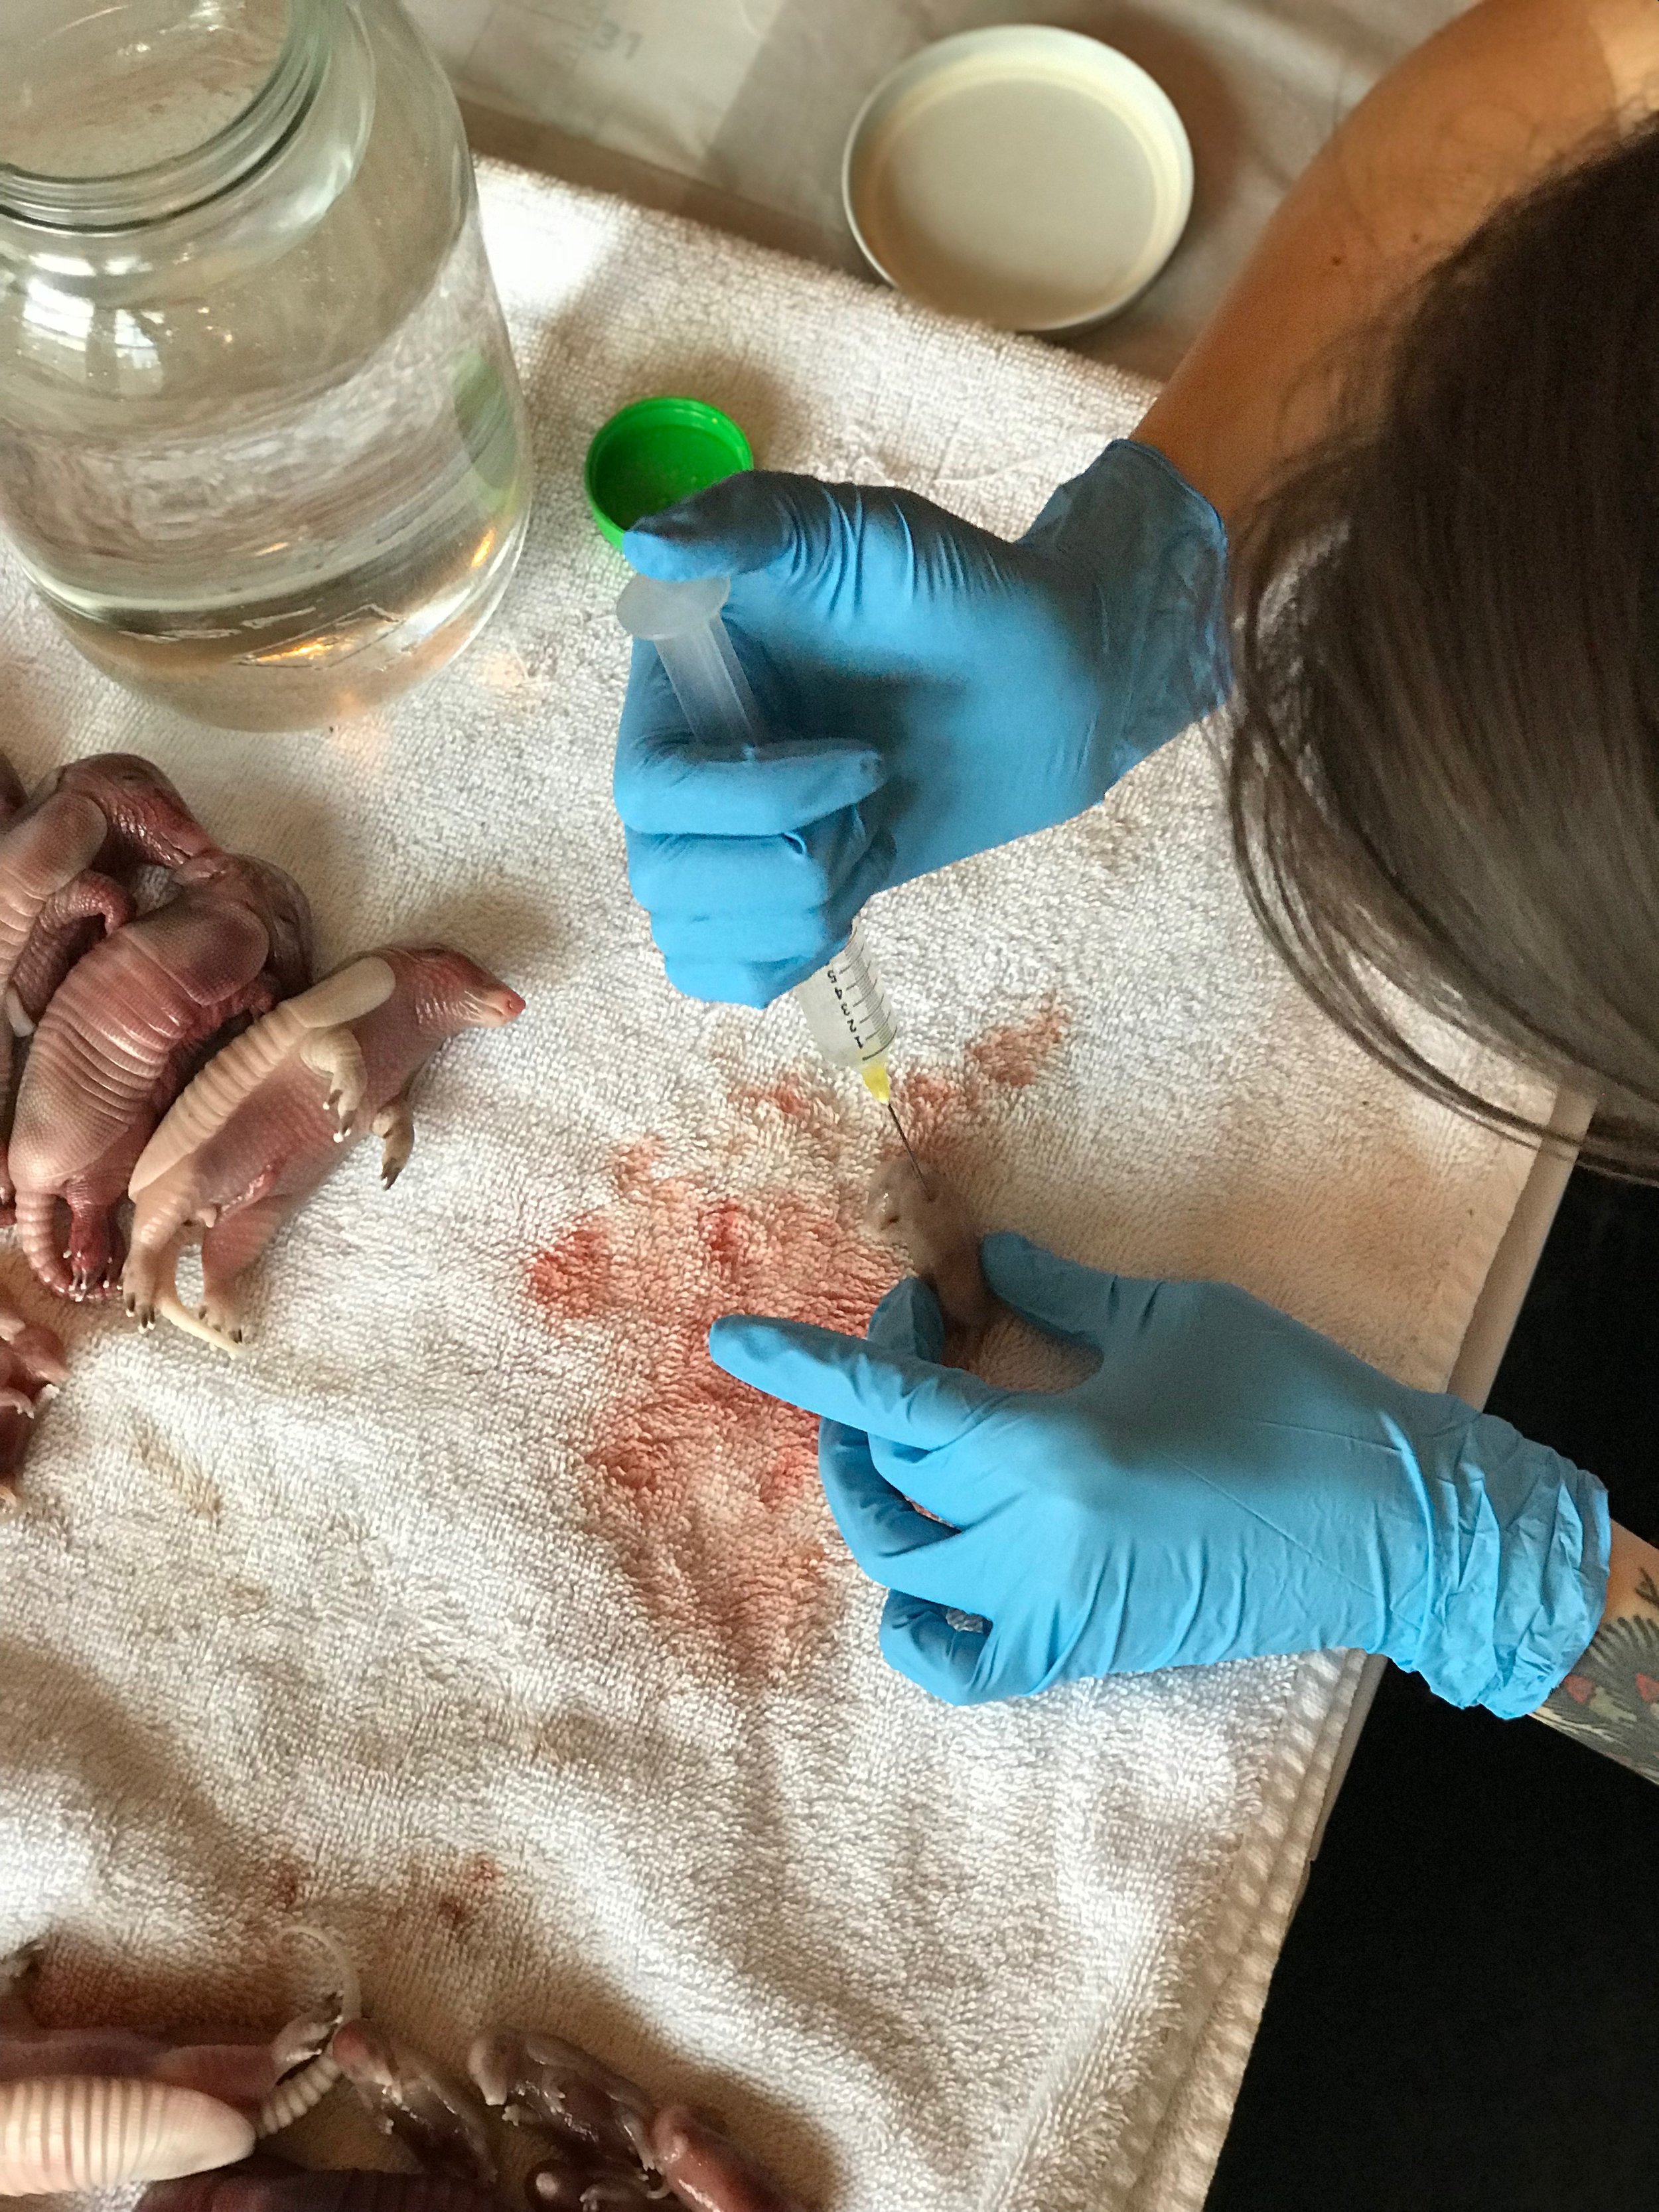
Make sure your specimen is thawed out completely. Dry any dampness (even from melted ice) as well as you can. Prepare your workspace by working on a tray covered with paper towels, or a puppy pee pad, so that you can dispose of any leakage easily.
Assemble your syringe and needle if you haven’t yet, taking time to tighten the Luer lock with pliers if needed. This will help you avoid air bubbles.
Open your formalin and insert the needle into the liquid. Slowly withdraw the plunger to minimize air bubbles. When the syringe is full, point your needle up directly at the ceiling so the syringe is parallel to the walls. Flick the syringe a couple of times to gather all of the air bubbles together, just like you see doctors do on TV. Using your non-dominant hand, hold a folded piece of paper towel over the end of the needle so it’s covered. Give yourself a few inches of space between your hand and the needle so that you don’t slip and poke yourself. Slowly depress the plunger on the syringe only until the largest air bubble is gone (no need to worry about teeny tiny bubbles). The paper towel is there to absorb anything that leaks out.
Always keep your specimen down on your work space. Many of my students are tempted to try to hold the specimen in one hand and inject with the other. DON’T DO THIS - you run a huge risk of pricking yourself or even embalming yourself. With the specimen down on the tray or pad, start poking your needle into the specimen and injecting a small amount of fluid with each prick. Make sure to pay special attention to the head, neck, belly cavity, lungs, legs, feet, and tail. If you are working on a partial specimen like an organ or just a head rather than a whole animal, use your discretion to figure out where to inject. An average mouse will take about 5-7cc of fluid. An average adult rat will take about 30cc of fluid.
Invertebrates with fleshy areas should be injected with alcohol and stored in alcohol. No formalin is necessary. Invertebrates with small parts can be placed in alcohol without any other preparation.
Right after injecting, the liquid will be pinkish.
MORE INFORMATION ON FORMALIN
Formalin CAN be filtered through a coffee filter and reused. I dispose of it when it starts to look murky or brown.
In regards to disposal: http://water.usgs.gov/admin/memo/policy/wrdpolicy93.044.html
Spilled or used formaldehyde is considered a hazardous waste and must be handled as a solid waste under RCRA. The generator--be it in the field office or the district office--must contact a hazardous waste contractor for appropriate disposal under RCRA regulations. An Environmental protection Agency (EPA) identification number must be obtained for each site from which disposal of a regulated material or waste will be made. Instructions on how to obtain an EPA identification number were included in the "Hazardous Materials Assessment" document transmitted on May 14, 1993, by the Chief, Branch of Operational Support. Uniform Hazardous Waste Manifests (EPS form 8700-22) and records must be maintained on the amounts of waste formaldehyde, storage time, and the contractor involved in the hazardous waste recycling.If this doesn’t make sense, basically you just need to find a hazardous waste treatment plant near you and when you have a jar or two full of formalin that needs to be disposed of, contact them. There may be a fee associated with this disposal. Pay the fee. NEVER dump formalin or anything containing formaldehyde into the trash, ground, sewer, sink, shower, toilet, etc. It WILL get back into our water stream and it WILL kill humans and animals if you do not act responsibly. You may also be able to contact a local funeral home and see if you can pay them a small fee to dispose of your formalin along with leftover embalming fluids and liquid biohazards.
As you inject, you will notice that the specimen will appear bloated and pink fluid will start leaking out. This is actually a good sign, so don’t worry about it too much. If you feel that too much is leaking out, stop actively injecting the specimen and continue using your needle to poke a hole every centimeter or so. These holes are important for the fixing process.
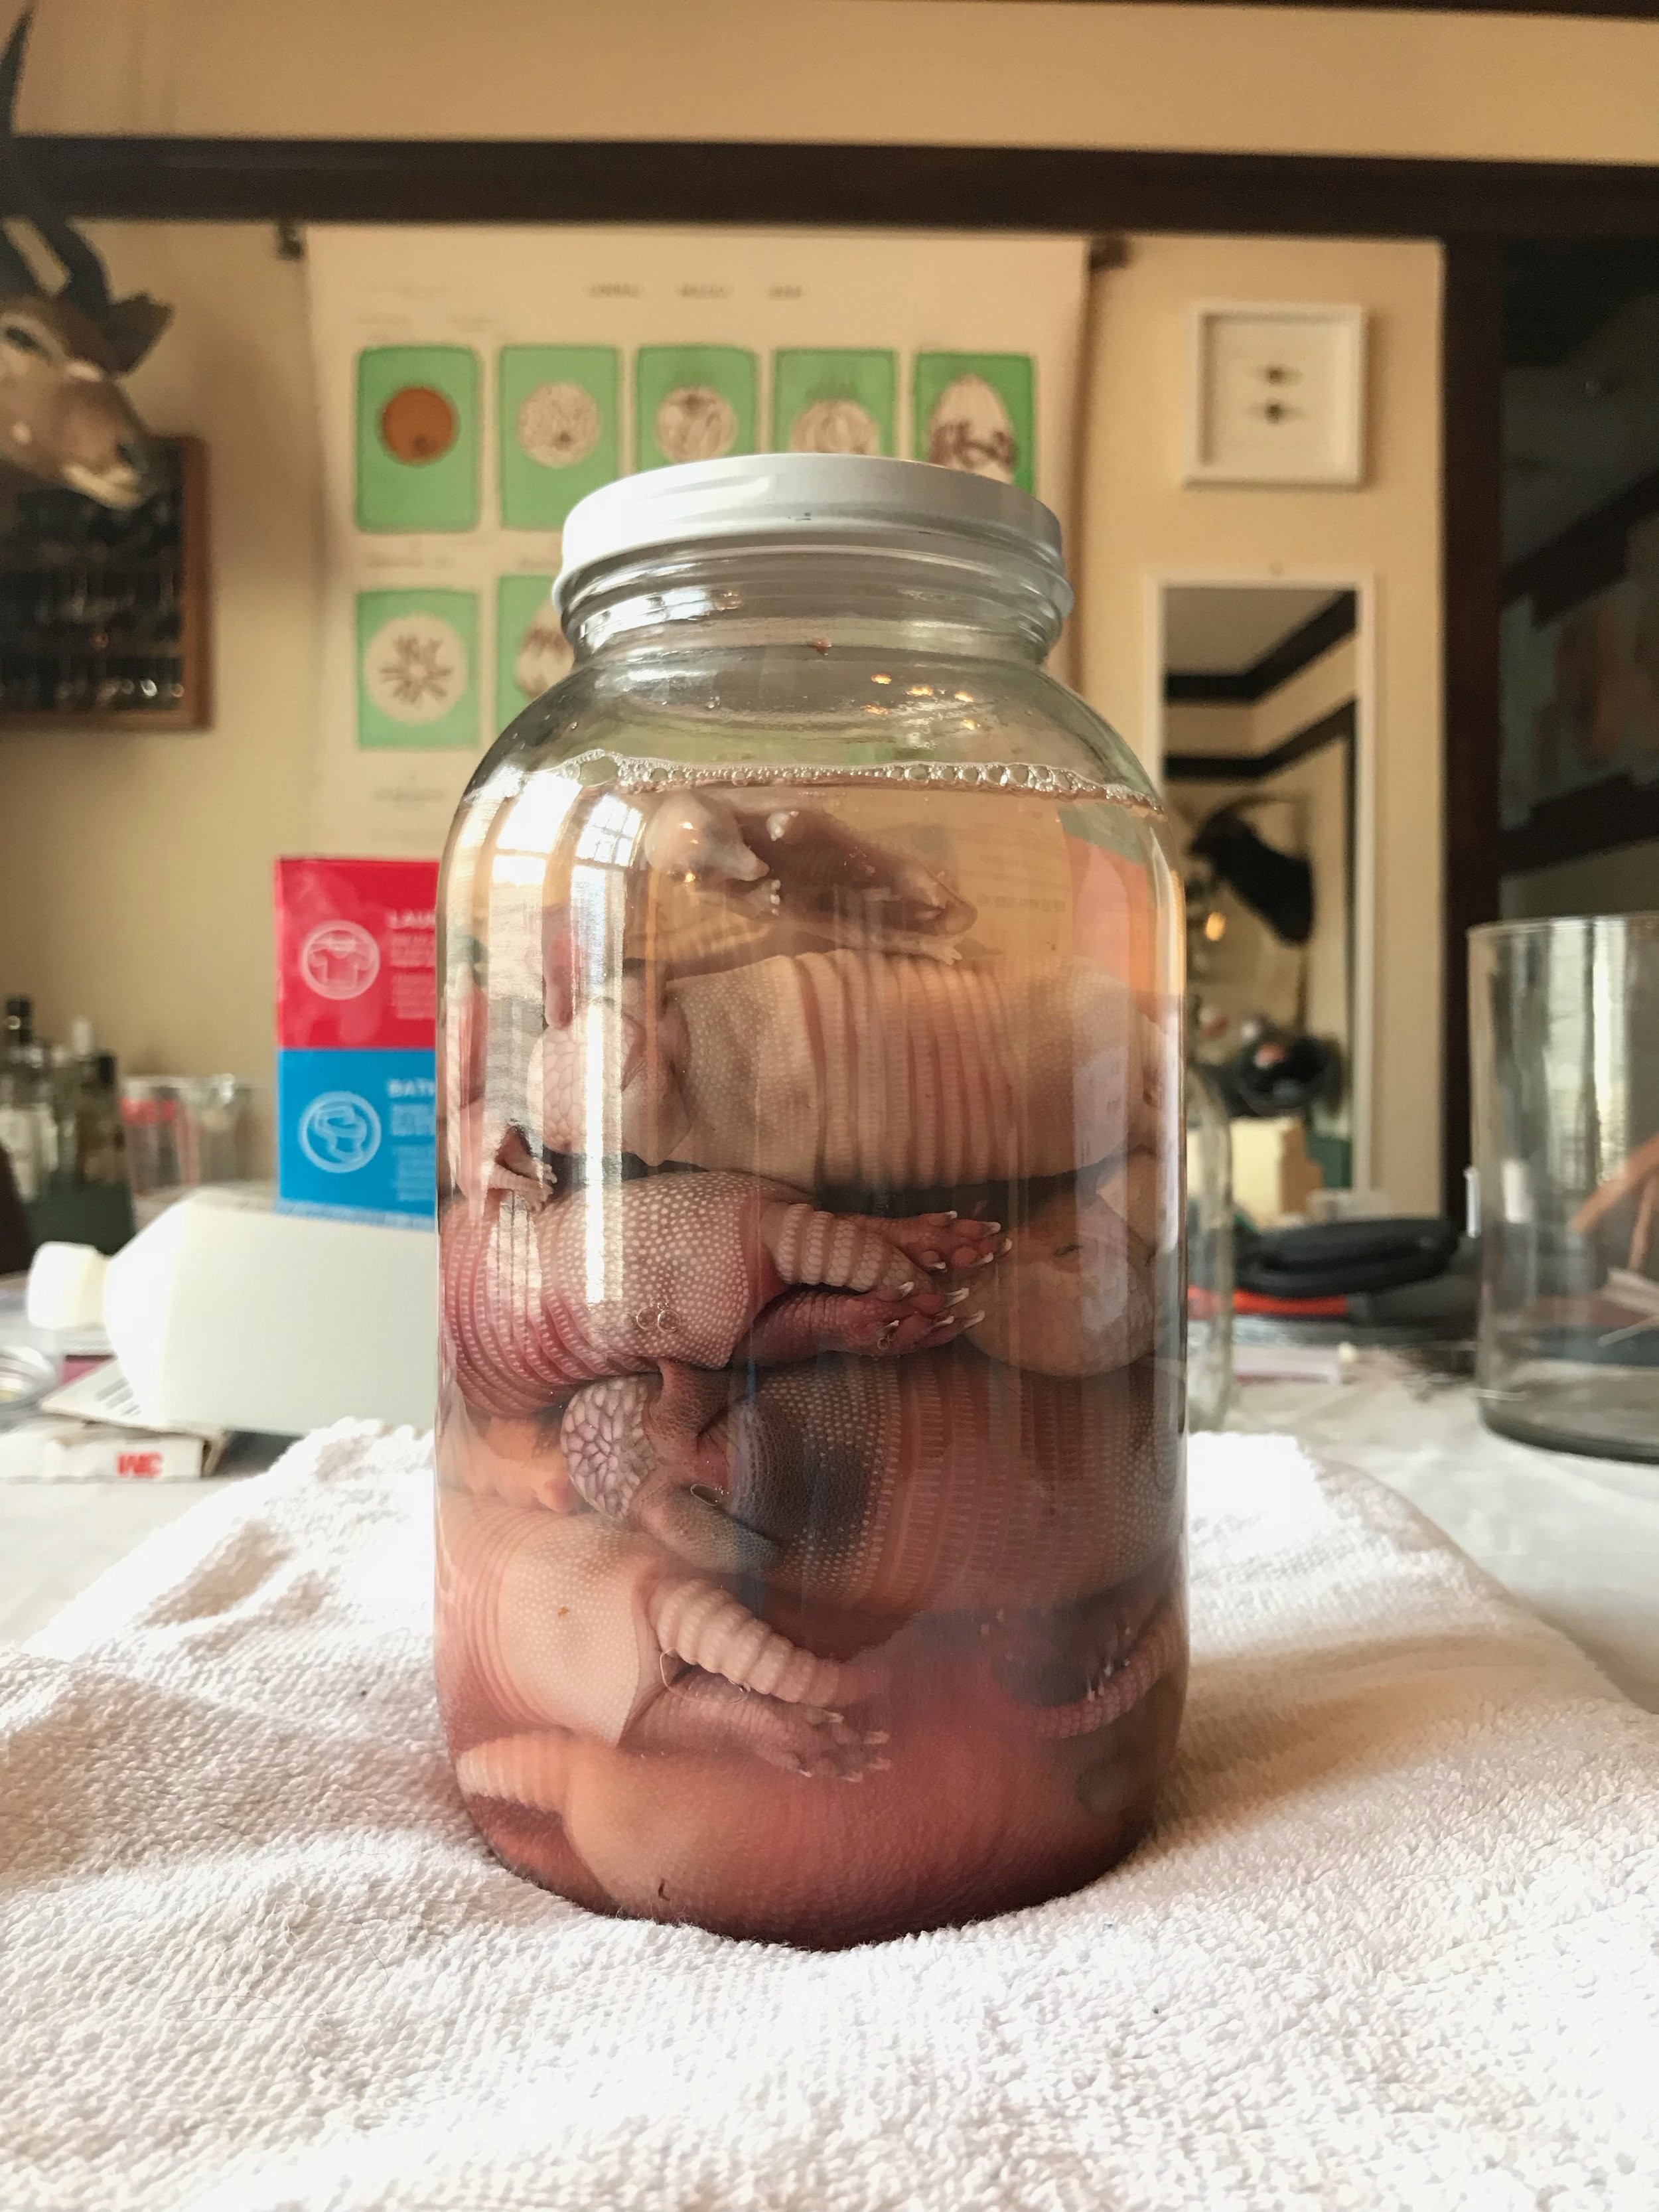
Several weeks of soaking later, and the liquid will be greyish.
NOTE: Wet specimen preservation uses two types of liquid solution: an acidic fixative (in this case, the formalin) which halts all bacterial activity and actively preserves the specimen, and a more neutral storage solution (in this case, alcohol) which will serve as a clear liquid to keep the specimen in for permanent usage and display.
The holes that you create encourage a process called fluid exchange. When you have sufficiently injected your specimen, place it into a jar of formalin so it is submerged, and seal the lid. Fluid exchange occurs when the fluids from inside the body (like blood) leach out into the fixative (formalin) and are replaced by the fixative (formalin) leaching into the body. This effectively preserved the entire specimen from the inside out. You will not get the same effect by just dumping alcohol over a small animal and keeping it in a jar.
Keep in mind that the position in which you place your specimen is how it will stay forever. The tissues will tighten and will not be able to be moved/bent/repositioned without breaking the specimen itself.
Clean up your work space by wrapping up any pads/paper towels/rubber gloves and throwing them out in an outdoor garbage can. Always make sure you put the cap back on your syringe if you plan on using it for additional embalming projects and LABEL IT so that someone doesn’t find it and try to use it for first aid or something.
Your specimen should be submerged in the formalin, but if it floats a little, don’t worry too much. Whether it floats or not, you should firmly but carefully shake your specimen every three days for a period of two to three weeks. This encourages the fluid exchange to occur but also helps dissipate any small bubbles that may be trapped beneath your specimen’s skin. After a few tries shaking it, the specimen should sink to where it’s supposed to be. If you follow my instructions through a full three weeks of shaking and your specimen still floats, it’s probably something wrong with the specimen itself (i.e. it wasn’t put in the freezer soon enough after death) and not something wrong with your technique.
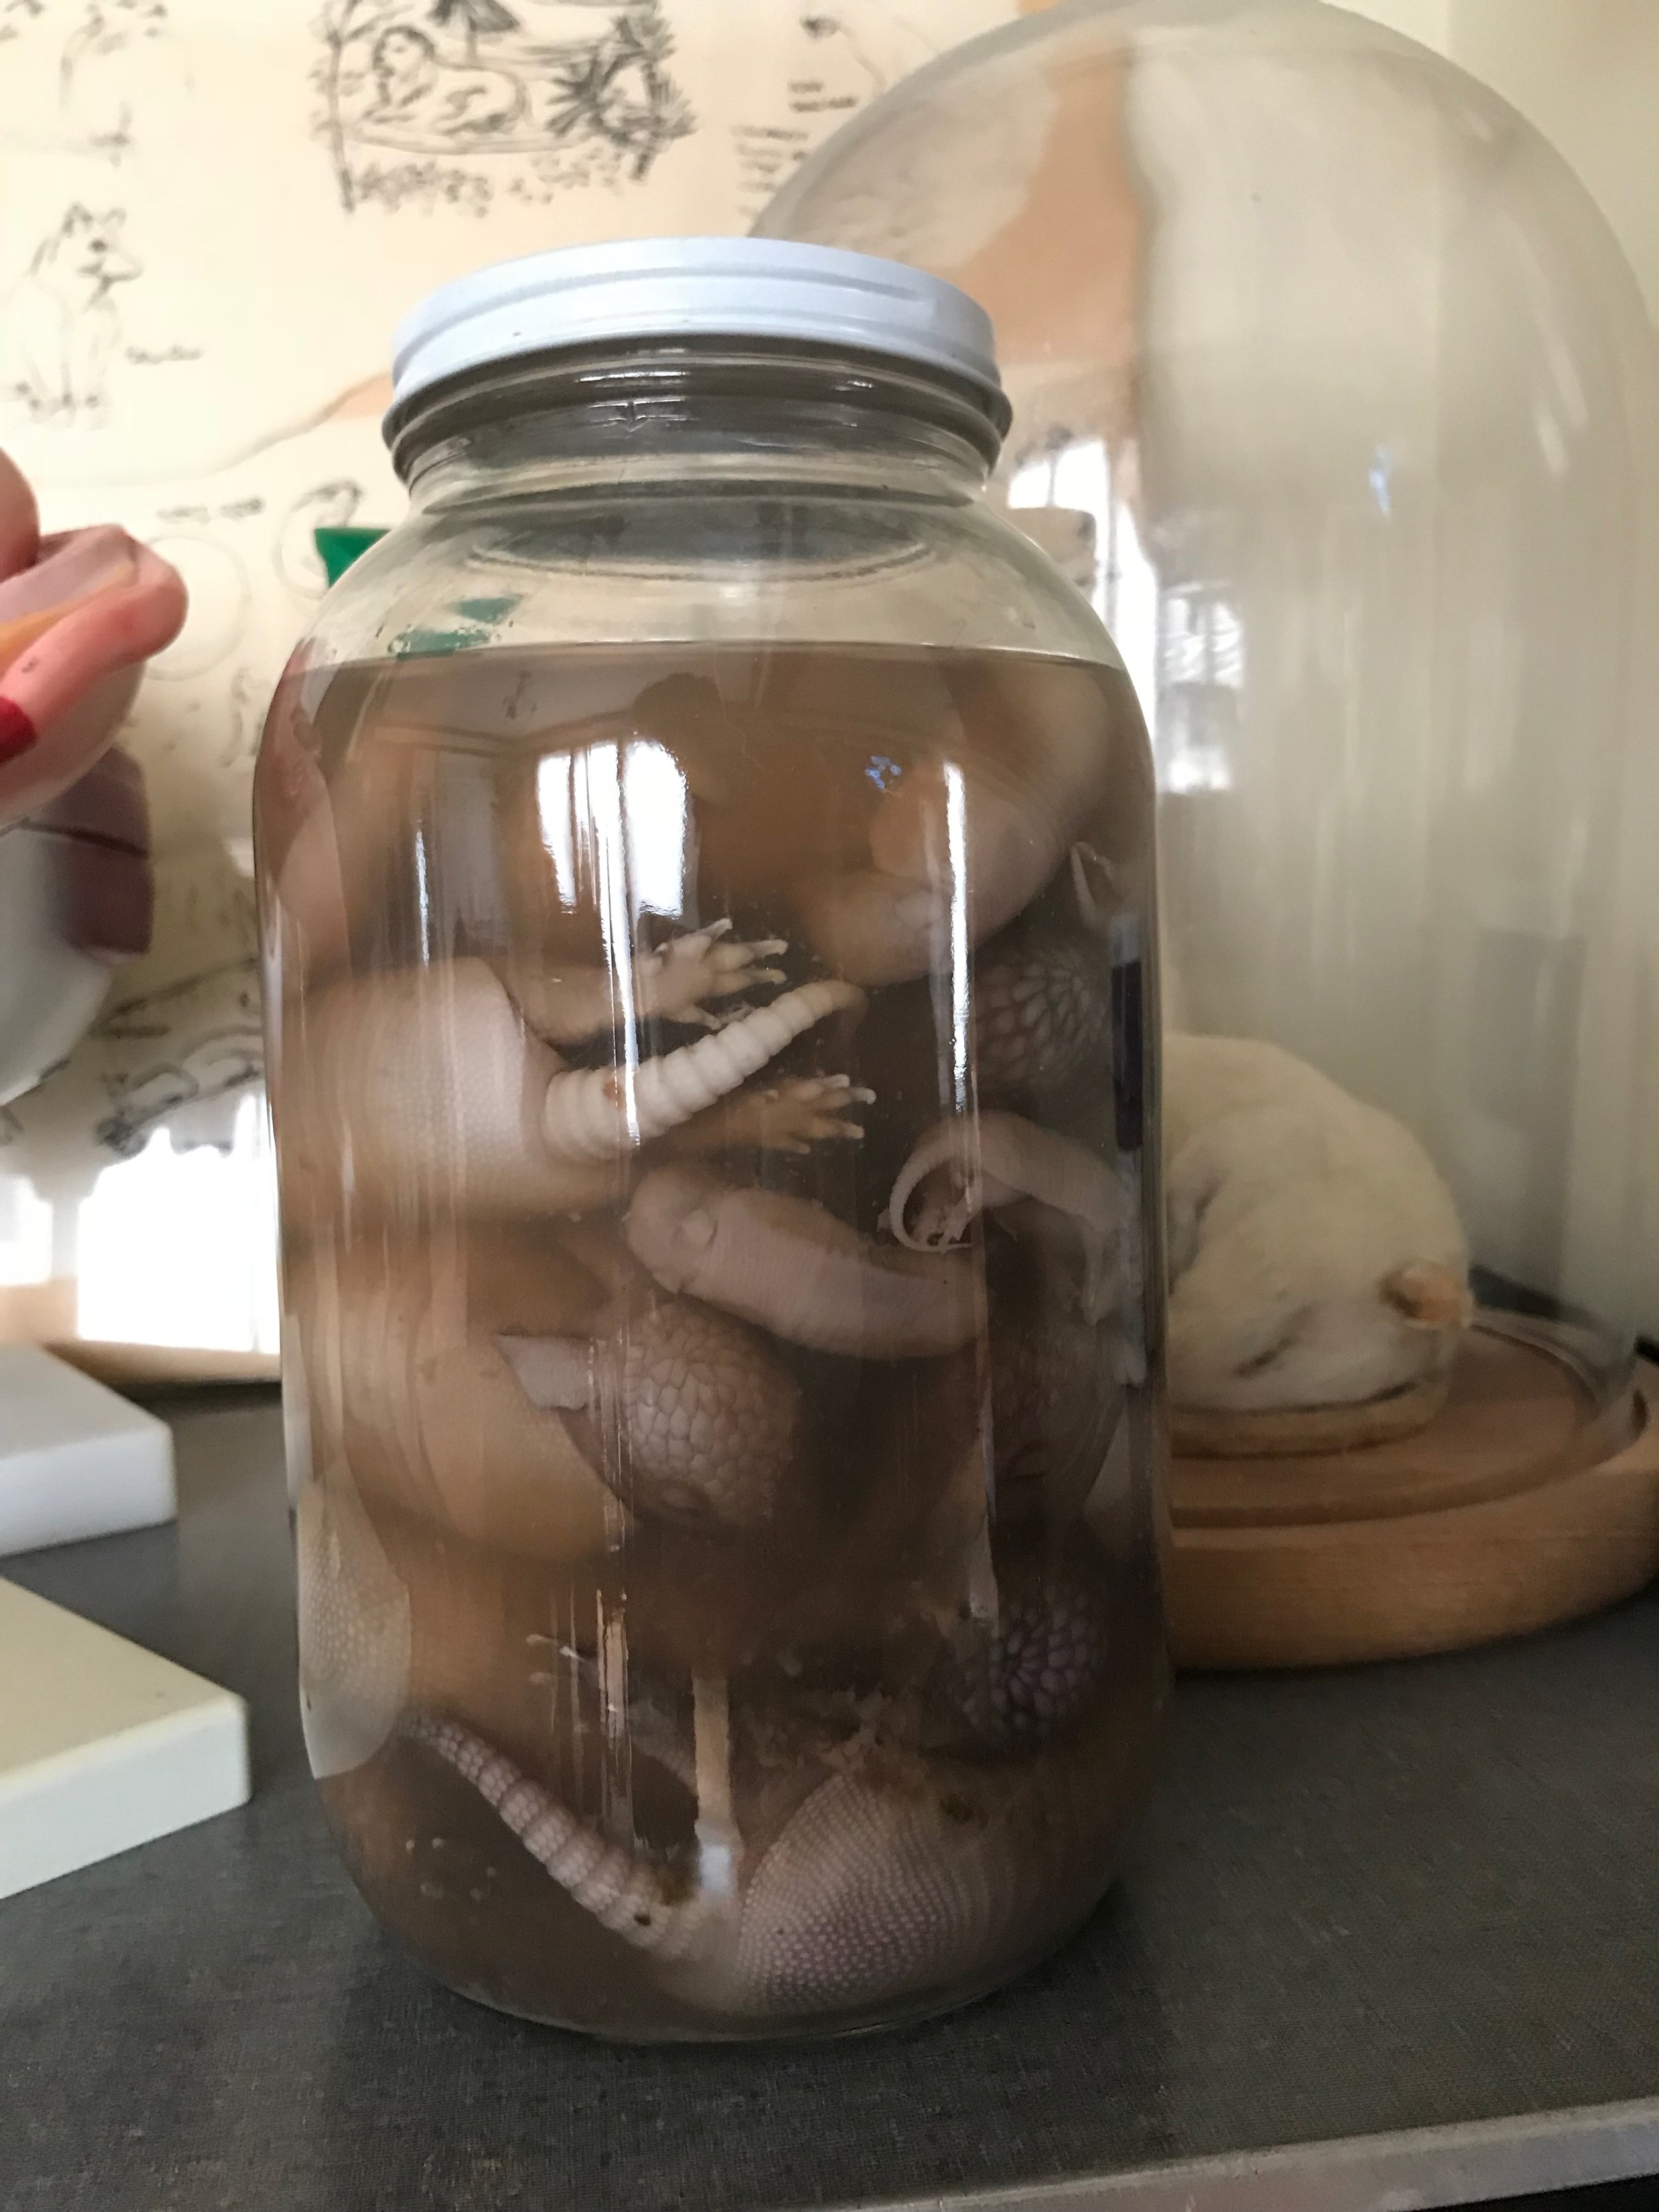
After the shaking period is over, it’s time to move your specimen to a permanent storage solution.
Ethanol is great, but 70% isopropyl alcohol is readily available at any drug store. The main difference is that isopropyl alcohol has a slightly larger molecule, due to the fact that it has been poisoned so nobody can drink it. This is a practice dating back to prohibition. Both ethanol (ethyl alcohol) and isopropyl behave the same way in this application.
Wearing gloves, goggles, and your respirator, you can simply fish your specimen out of the jar and place it into a separate jar, or you can take it out and rinse it.
NOTE: Rinsing is especially helpful to remove any hardened blood or other tissue that has “leaked” out of the specimen. These bits of tissue are simply liquid that has reacted with the formalin. As you recall from above, formalin is acidic and reacts with biological tissue by “fixing” it, which means it halts bacterial growth and slightly hardens the tissue. The “leakage” will appear slightly pink as a “growth” from the holes you created with your needle, and should be easily rubbed off under running water.
Because I own so many jars and I do this so often, I typically just place my specimen into a new jar and top it off with 70% alcohol before sealing the jar. However, if you do not have an extra jar, I would put the specimen on paper towel while you momentarily dispose of the formalin or put it in another container, then replace the specimen in the same jar and top it off with alcohol.
STORAGE & CARE

After following all of the steps, your specimen should look great in a clean jar with fresh alcohol.
Always store your specimens away from sources of heat, like fire, open flames, direct sunlight, a radiator, etc. Alcohol and formalin are highly flammable so don’t store them near a stove, fireplace, don’t smoke around them, etc. Use common sense to decide where in your home your specimens will be safest.
Sunlight will degrade the specimens.
Store away from pets and children.
Never EVER eat, drink, or allow anyone else (human or animal) to eat or drink any part of your specimen, including any of the liquid solutions. If your jar breaks, use gloves to carefully pick up the large glass and specimen and dispose of it immediately. Absorb any liquid with cat litter or sawdust (along with sweeping up the leftover glass) and put it all in the trash. Make sure to wash the floor afterwards. I do realize that I just said a few paragraphs up never to throw formalin in the trash, but absorbing it this way and disposing of it is obviously safer than having a puddle of carcinogenic liquid laced with shards of glass in the middle of your floor. If you have the opportunity to contact your hazardous waste disposal and treatment center before throwing anything in the trash, please do so.
Other resources you may find helpful:
Information on how I got started in taxidermy (and how you can, too)
A discussion on “ethical” taxidermy (which is why I started the sustainable taxidermy movement)
TROUBLESHOOTING & FAQs
I put my finished specimen in alcohol a few weeks ago and the alcohol has turned yellow. What do I do? Specimens are organic and will continue to leach dark liquid over time. You have two options. The first is to just let it do its thing, and the second is to treat your specimen the same way you did when you first put it in alcohol. Use gloves and wear your respirator, transfer the specimen onto paper towel or into a new jar, empty out the old alcohol (alcohol can be flushed down the toilet), and replace the specimen in the jar with fresh alcohol.
My specimen is floating. What do I do? If your specimen is still in the first few weeks after completion, make sure you’re following the instructions from above and shaking it every few days to dissipate air bubbles. If your specimen has been completed for a long time and is suddenly floating, it is likely that the animal was either already decomposing when you started, or you did not preserve it properly. Using the waste disposal guidelines from above, dispose of the entire thing as described and make sure you have a fresh specimen and follow the directions to a T the next time.
Can I use a plastic jar? If you are a chemist and are positive that the composition of the plastic is compatible with formalin and with alcohol, sure. If you are not a professional chemist, stick to glass. Some plastic will melt when it comes into contact with chemicals like this. The plastic lids that come with jars from places like Uline, and all of the jars I linked to in this article, however, are safe to use.
If you have other questions, please make sure you have read through this entire article as well as my last specimen tutorial. I would also suggest reading the comments. I will probably not respond directly to the comments left on this post, but I will reply to questions sent through my contact form so long as you follow the instructions on the form. Thank you.
I offer an array of taxidermy classes, specimens for sale, tutorials, and kits in addition to fine jewelry. If you like learning about natural history, follow along on Instagram. Thank you so much for reading, and I hope you learned something useful. Enjoy!